EASY STEP BY STEP PROCESS
How to DOWNLOAD your pattern
The following steps will guide you through downloading, printing and assembling of A4 size and the US letter size pattern pages.
- Proceed to complete the payment process.
- Once the payment process is successfully completed, you will receive a notification containing the download link.
- Download the PDF-Zip file to your computer. Please note that it is not recommended to download the file on your tablet or phone, as these operating systems may not be compatible with handling large files. The pattern files, provided by the Pattern Faculty-LK, are compressed into a PDF-Zip format for easy delivery via email or any other downloadable method. In case you do not have software to extract the contents of the zip folder, you can download it from the following link: https://www.7-zip.org/download.html
- Extract the contents of the zip folder and save them to your computer. Refer to your computer systems how to extract zip folder. It can be as simple as right-clicking and selecting Extract All.
- You will receive a full-size block/pattern, as well as a number of pages of “A4” size or US letter size, depending on your chosen product. You have the flexibility to choose between two options for printing: either at a print shop or in the comfort of your own home, where you can print and assemble all the pieces together. If you decide to print the pattern at home, the process is briefly outlined below.
- Save your file securely.
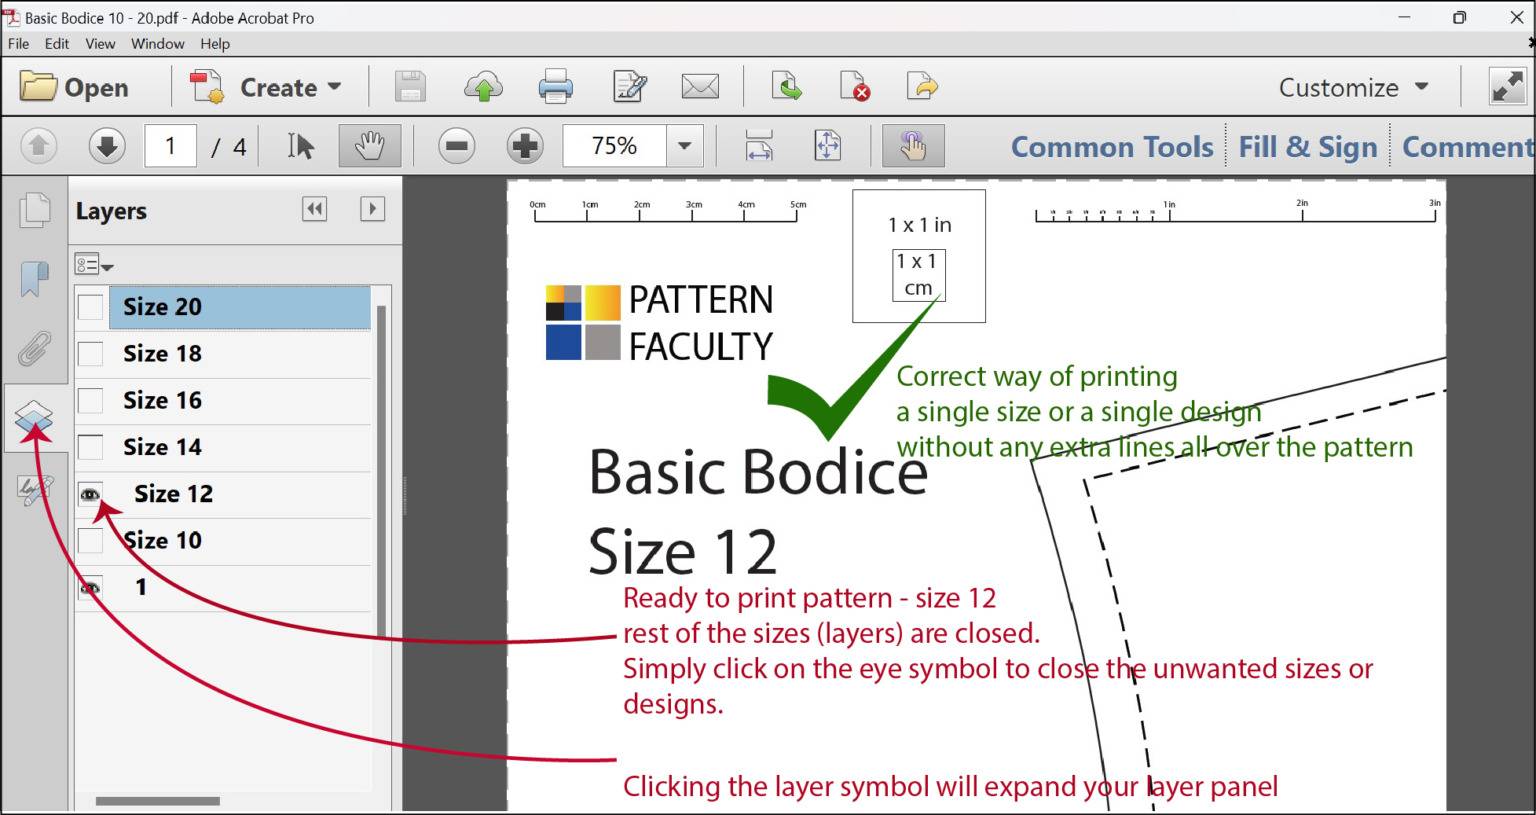
For your convenience, all our PDF patterns are clearly labeled. The majority of our patterns are provided as individual PDF files, while some patterns may be included in an all-in-one PDF file with separate layers. Lets explore how the PDF layer panel functions:

- Open your PDF pattern file using Adobe Reader.
- Locate and click on the layer symbol found in the left navigation panel. This symbol is illustrated in the image above in blue.
- In the layer panel, you have the flexibility to choose any desired size or design for printing. You can disable unnecessary layers by turning off the Eye symbol associated with them.
- Once you have selected your desired size or pattern, you can proceed to print it. Screen short of layer panel is showcased below:
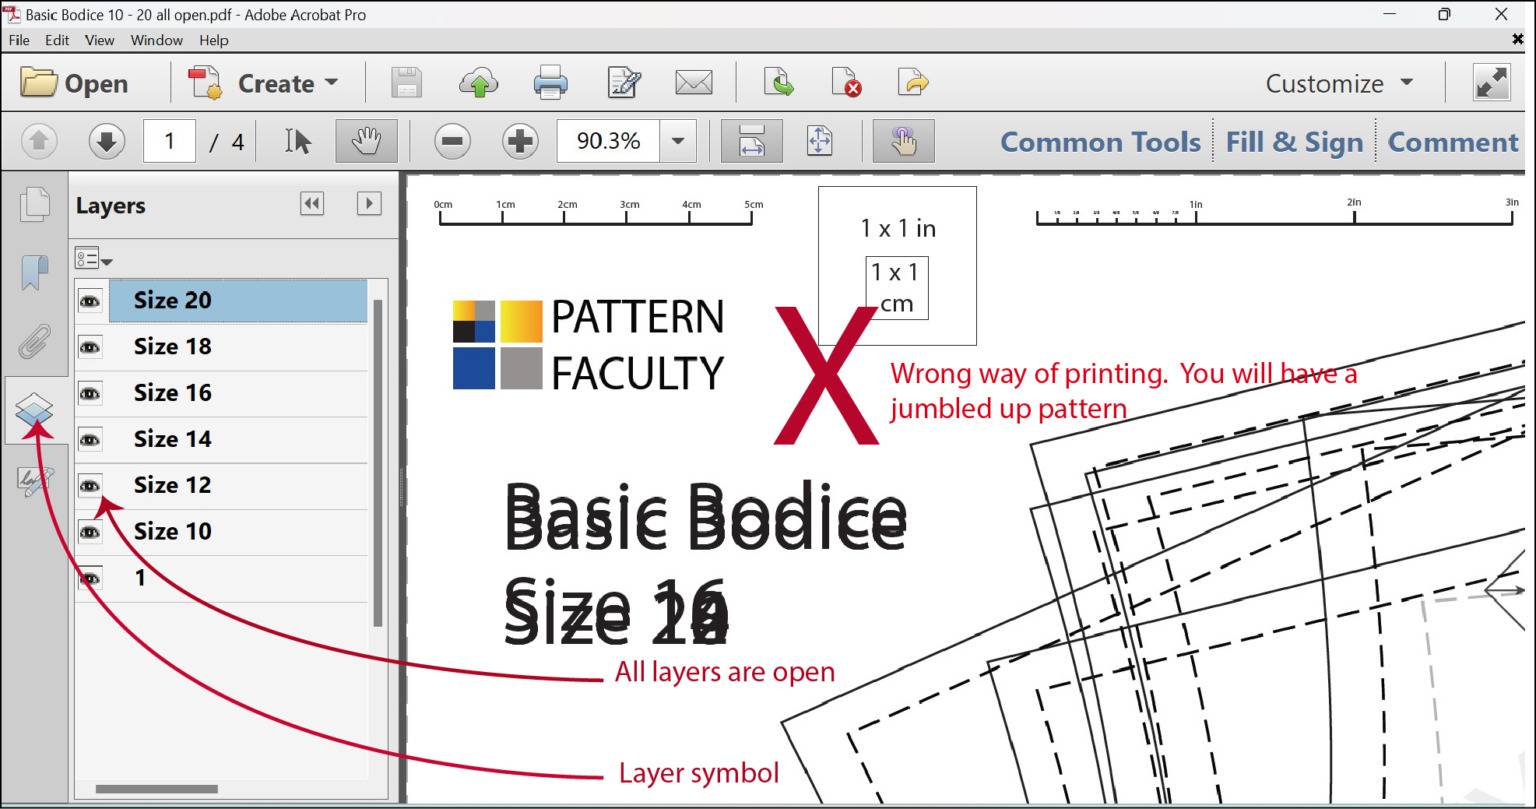
If you don’t select a specific pattern size or design, the patterns may overlap each other, creating a jumbled appearance that makes it challenging to identify the individual pattern lines easily. This typically occurs when the pattern incorporates multiple styles or elements. This can also happen if you try to open the pattern directly from a compressed zip folder without extracting it first. To avoid this issue, please unzip the zip folder and open the desired PDF panel that you wish to print. Here is a visual representation of how the patterns look when you open all the layers.
By following these simple steps, you can effectively utilize the PDF layer panel to select, print, and save the sizes or designs you need.
Printing
Ensuring the pattern maintains its proper scale and dimensions is a crucial step in the process.”
When you are prepared to print the pattern, carefully follow the instruction provided to set up your printer for printing the block/pattern at home. Alternatively, if you prefer the convenience of a printer shop, you have a couple of options. You can either email the file to your chosen printer or transfer it onto a flash drive and take it to the shop. Any printing shop should be able to assist you in printing the pattern on either A4 size or US letter size paper.
If you wish to print the pattern at a printer shop on a larger paper size, such as A0 or any other size, that is also possible. We are providing larger paper printing option with all our patterns. Just make sure to specify your desired paper size when placing the order. In any case, ensure that the pattern is printed at ACTUAL SIZE to maintain accurate proportions.
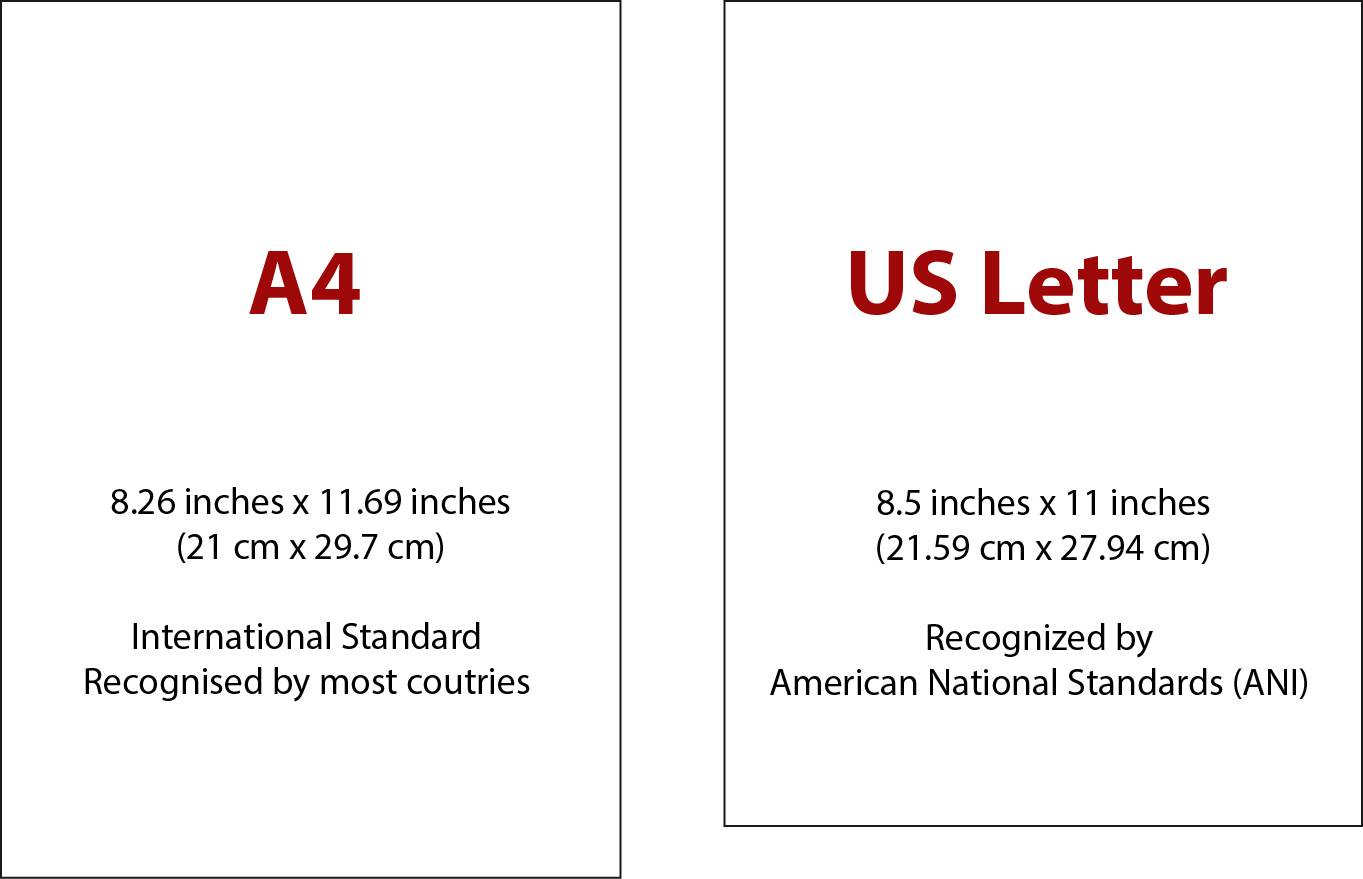
Our primary paper formats consist of A4 size (8.26×11.69), widely recognized by most countries, and US letter size (8.5 x 11), which conforms to the American National Standards. We offer both of these paper sizes, along with larger options that allow for printing on a single sheet without the need for assembly of multiple pages. The specific dimensions of the papers may vary depending on the pattern being used. For your convenience, each pattern will include the corresponding paper sizes we have utilized to set up the pattern.
Main two paper sizes.
HOME PRINTING
To achieve 100% accurate printing, follow these steps to set-up your printer.
- Make sure that you are using the correct paper size, such as A4 or US letter, for printing. Feed the appropriate paper into your printer and select the corresponding pattern.
- Set the printer scale to Actual Size to ensure the pattern is printed at its intended dimensions.
- Enable the orientation setting to Auto portrait/landscape to allow the printer to adjust the layout based on the patterns orientation.
Printing the test paper (scale check)
Before printing your pattern, it is crucial to print the accompanying test paper provided with the pattern. This step is essential to ensure that the scale is accurate, guaranteeing that the pattern will be printed in the correct dimensions. Please remember to carefully print and check the test paper before proceeding to print your pattern.
To verify the accuracy of the scale, use a ruler to measure the inch grid and the cm grid on the test paper. Compare these measurements to the indicated scale on the test paper. If the measurements on your ruler align with the scale and grids on the test paper, it indicates that your printer is properly set up. You can then proceed with confidence to print your pattern using the appropriate paper. If the scale is incorrect, please check your printer set-up and print your test paper again before proceeding to print your actual pattern.
Printing the actual pattern
Once you are satisfied with the correct scale on test paper, you can print your pattern using A4 or US letter size. Once again, make sure the printed pattern is to the correct scale, by measuring the inch square and the cm square given on 1st page of each pattern before assembling your patterns together.
By following these simple initial steps carefully, you’ll save yourself a lot of time and avoid wasting paper or fabric on incorrectly sized garments. It’s important to take these instructions into consideration to ensure that your pattern is printed correctly. Please follow these steps to minimize any potential errors and confidently proceed with creating your garment.
PRINTING FULL SIZE
If you would like to print your pattern on a larger paper to save time and avoid the hassle of assembling multiple A4 or US letter sized papers, you have the option to do so. Nowadays, there are many affordable printing facilities available where you can get your pattern printed. Staples and PDF plotting are just two examples of places you can consider in the United States or Canada. Please note that we (Pattern Faculty-LK) are not affiliated with or benefitting from any specific printing shops this information is given to you purely to assist you.
When placing your order for larger paper printing, be sure to clearly specify that you need black and white Engineering Printing, to keep the cost reasonable. Otherwise, the cost could be significantly higher. Before giving the pattern for printing, check with the chosen print shop for pricing and available paper sizes.
Once you receive the printed pattern from the shop, take a moment to check the test square on the pattern before leaving the store. This will help ensure that the scale is accurate and prevent any future issues or complications of having wrongly sized garment.
Now, you can create a test garment using inexpensive fabric to assess the fit. If you require any alterations at this stage, you can follow the links provided below to modify your pattern before cutting into your actual fabric. This allows you to fine-tune the fit and make any necessary adjustments, ensuring a better outcome when working with your final fabric.
https://blog.patternfaculty.lk/saree-blouse-tutorial/
https://blog.patternfaculty.lk/alterations-tune-ups/
Sewing allowance and Facings: Please note that not all of our patterns/blocks come with sewing allowance or facings. The product description for each pattern provides detailed specifications, including whether sewing allowance or facings are included. It is important to thoroughly read the product description before making a purchase to ensure that the pattern meets your specific requirements. By familiarizing yourself with the provided information, you can make an informed decision and select a pattern that aligns with your sewing needs.
Sewing allowance and facings are crucial for proper construction and finishing of your garment. Sewing allowance provides the necessary space for seams, while facings contribute to a clean and professional-looking edge or neckline. Please double-check that your pattern incorporates these essential components before proceeding with cutting and sewing.
A4 & US LETTER PATTERN ASSEMBLING
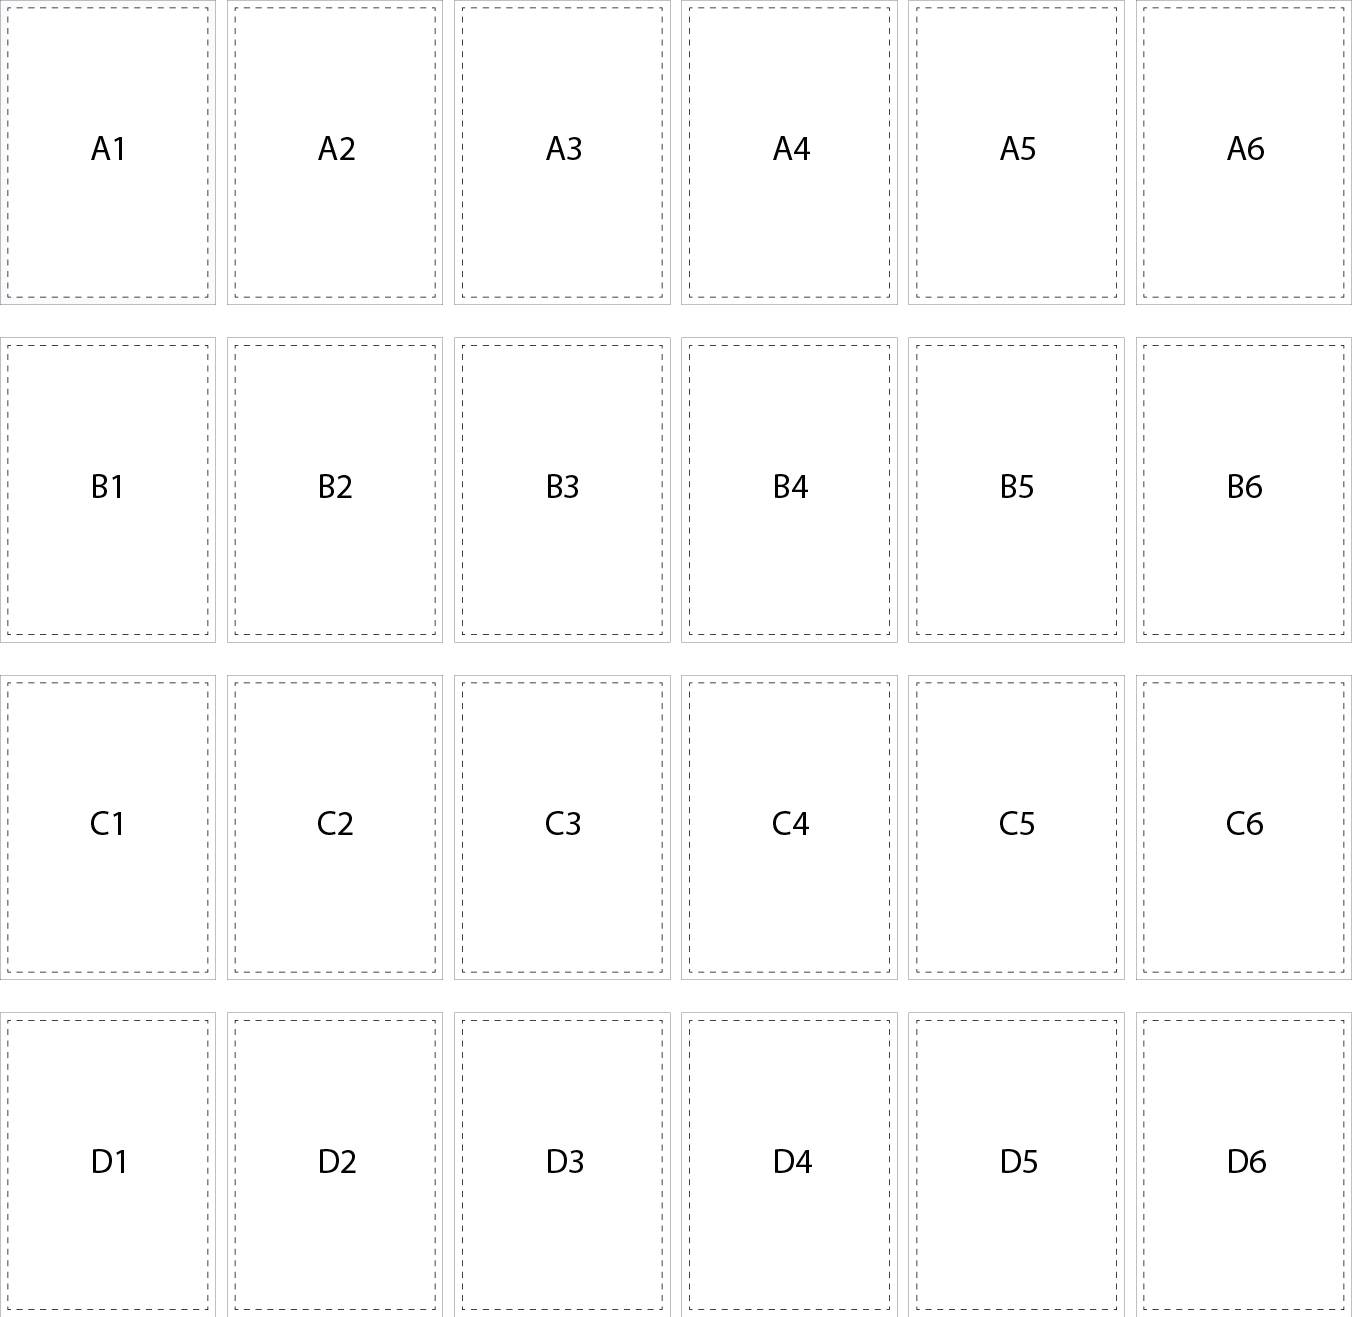
Number of A4 size or US letter size Pattern pages depending on the size of your pattern. Once you get all your pattern pages printed, check the scale to see the accuracy. If you are happy with the pattern, organize the pagers together. The page numbers are numbered horizontally as A1, A2, A3, A4 etc. and vertically A1, B1, C1, D1, then A2, B2, C2, etc. as shown below.
Here is an example of first page of printed pattern paper (in white). This is an example only.
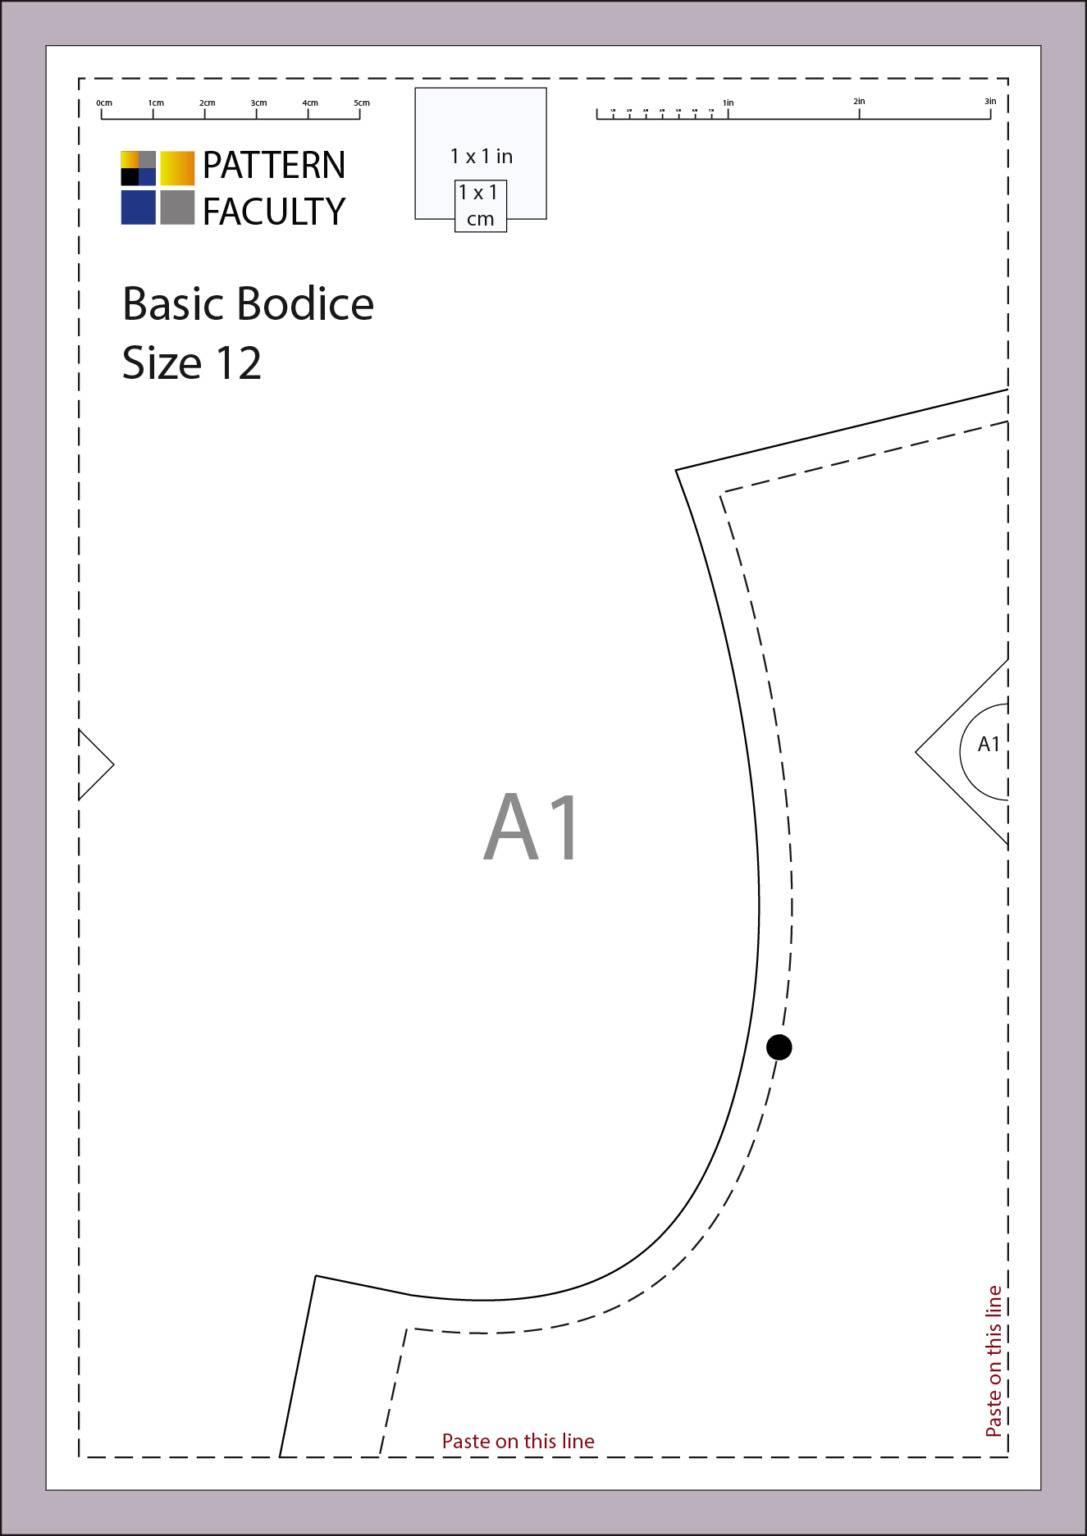
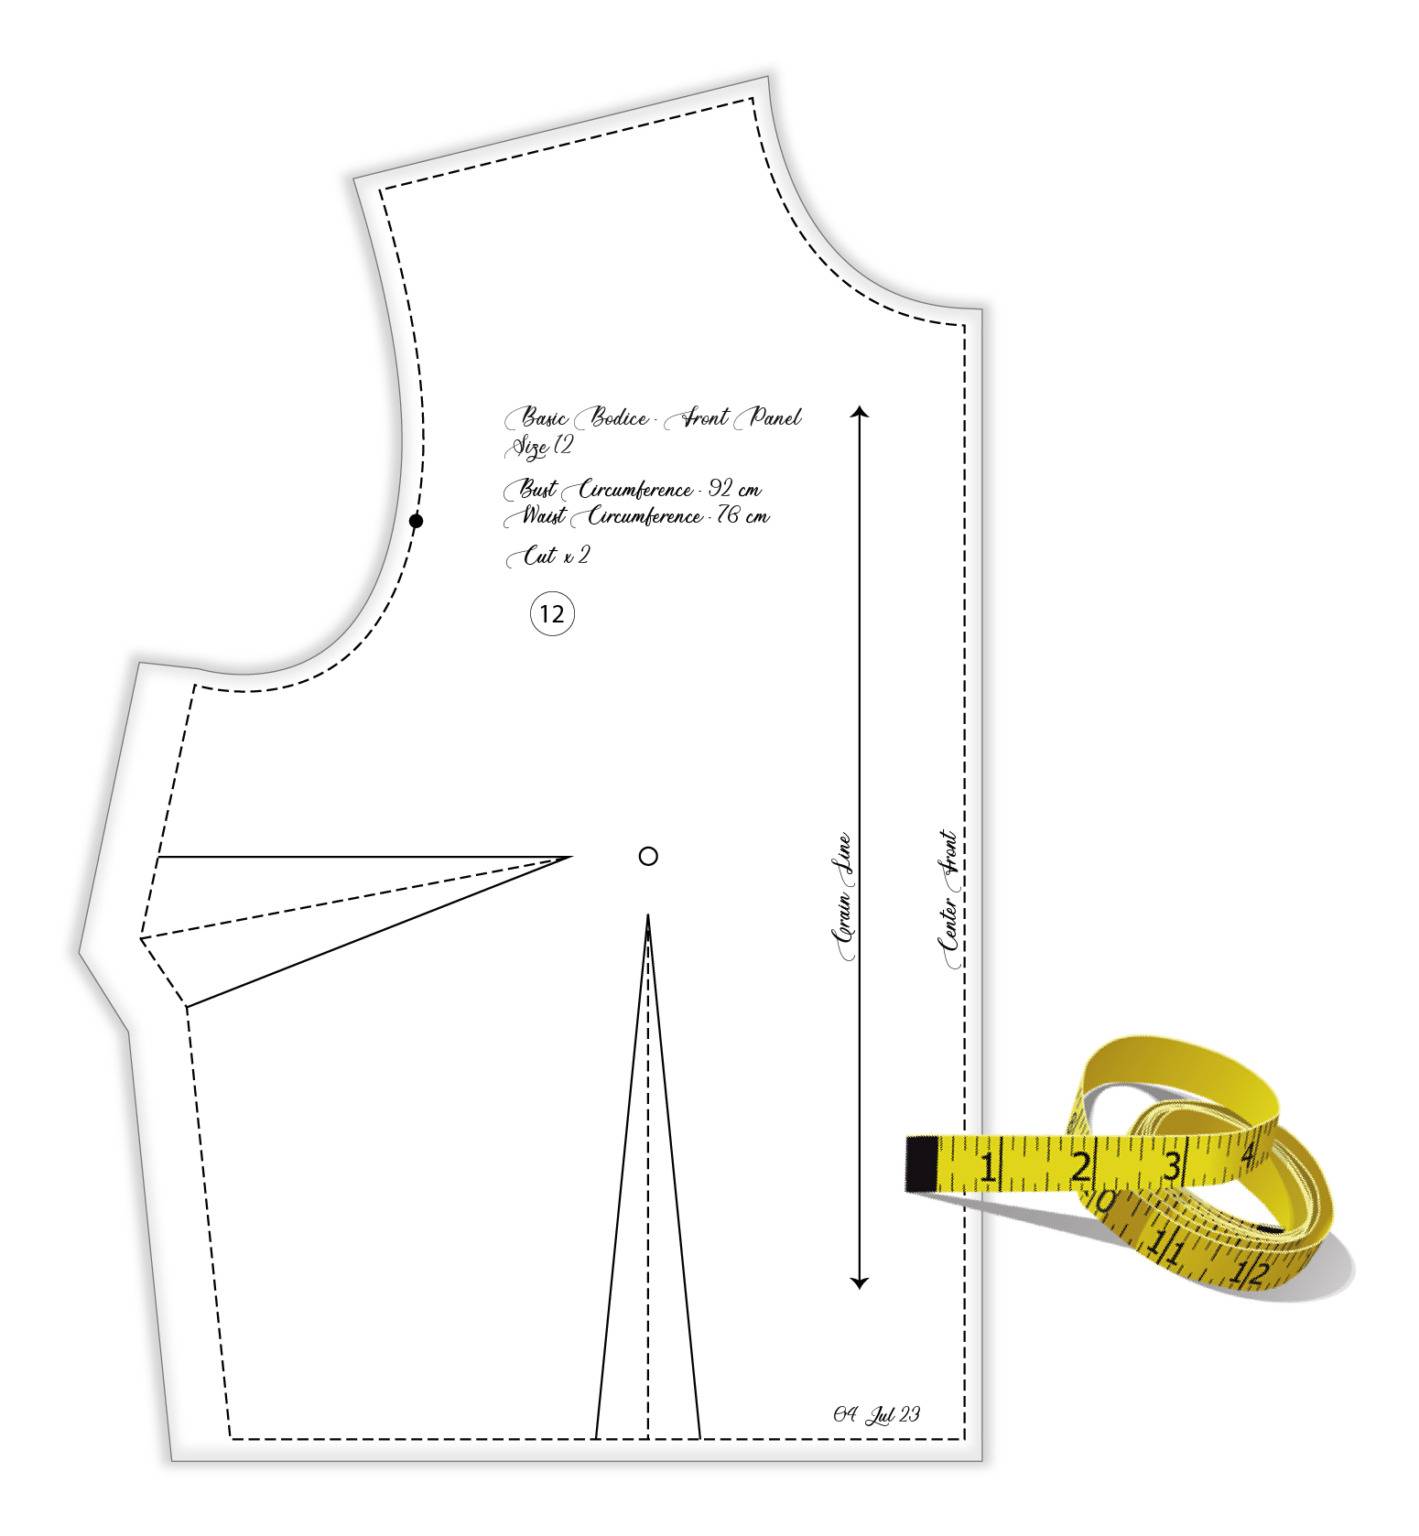
Printed size 12 basic bodice front panel.
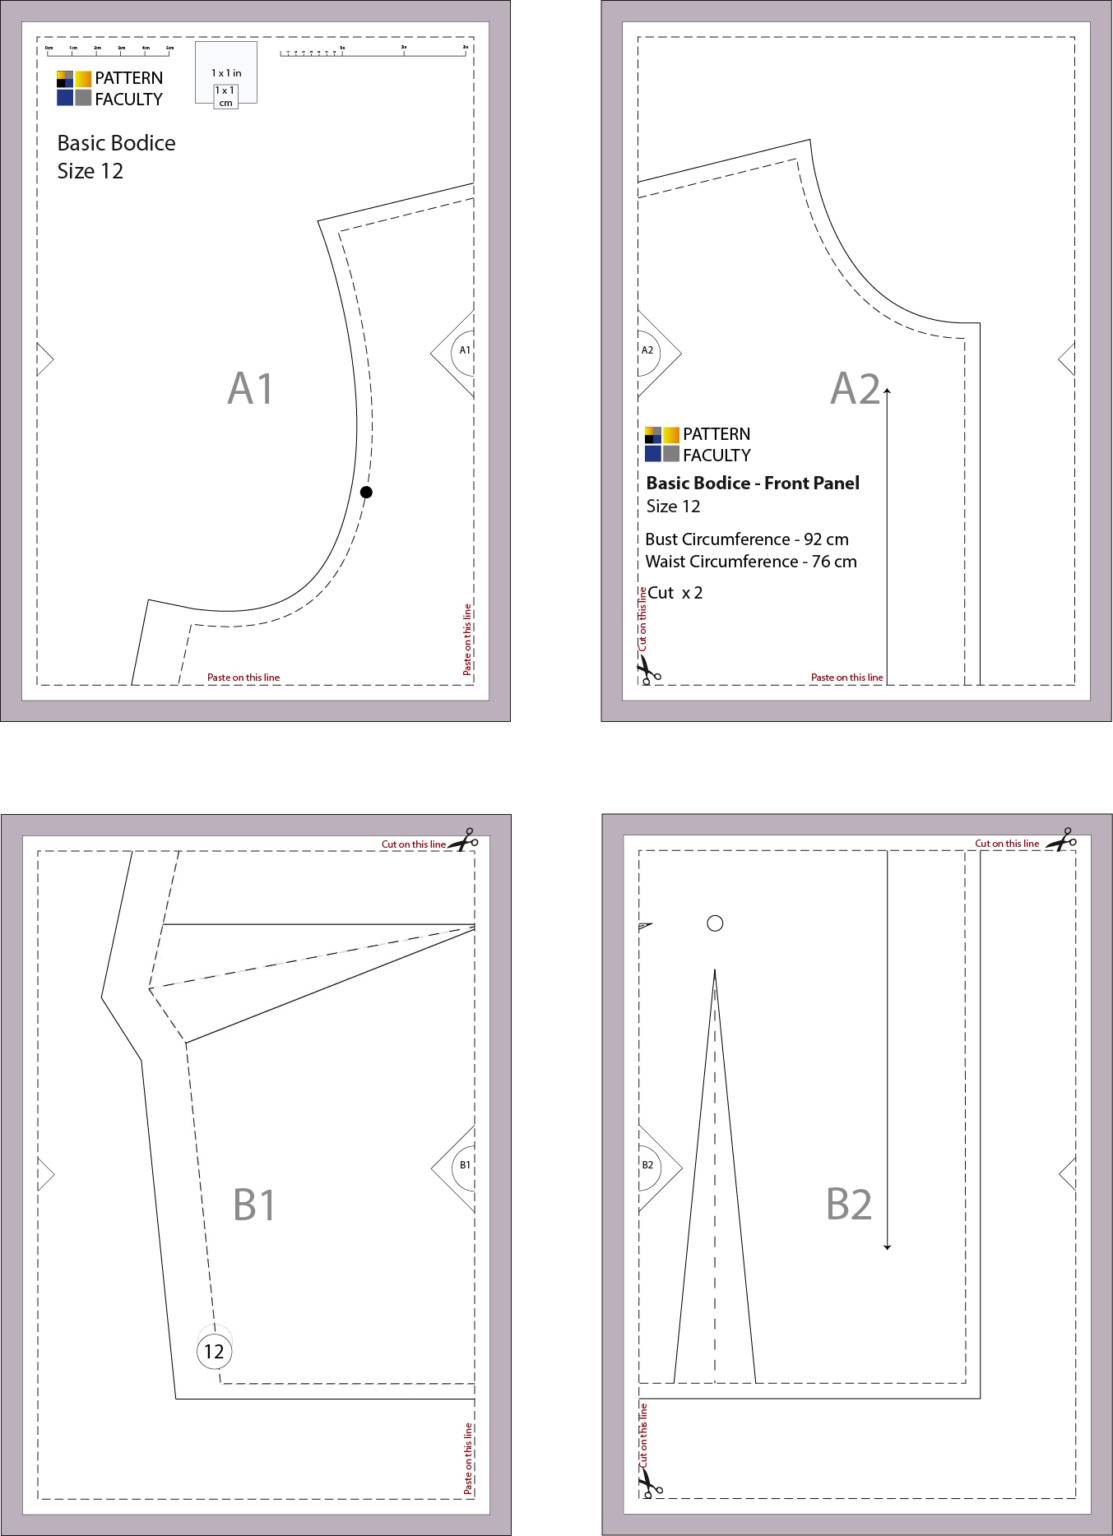
To make things easier for you, each page marked with a scissor symbol where you need to cut. Once you cut through the lines, align all squares in the middle of each paper and tape them together.
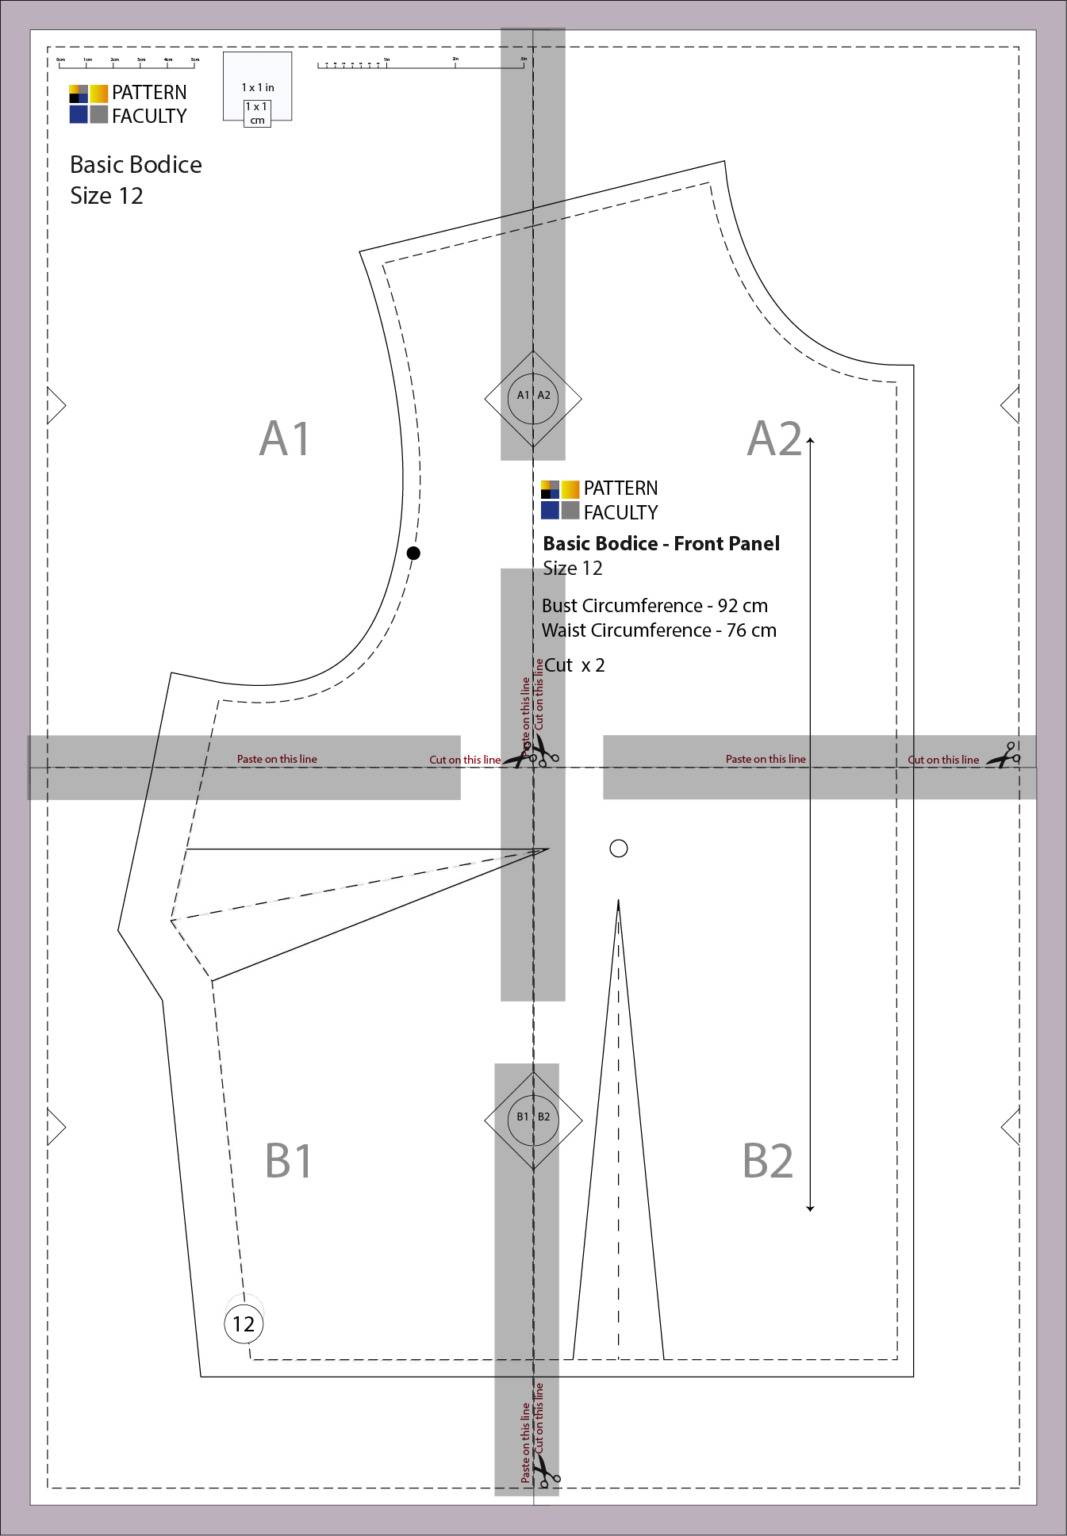
Assembled Pattern
Once you assemble the pattern together, it should look similar to the below image. You may trace it to a single paper to work on.
Traced Pattern
Make sure to trace all the essential details onto the pattern, including darts, notches, sewing lines, and any other relevant features. Additionally, remember to write down all the necessary information on the traced pattern, such as the pattern size, measurements, the person’s name, date, and any other relevant details. Taking the time to do this now will save you a lot of time in the long run.
***How to assemble A4 size pattern at home – Video
Important: Please note that this video displays a pattern with sewing allowance and facings. Not all patterns come with sewing allowance and facings. Please refer to your product description.
When you get your pattern printed, make sure to check the test square before leaving the store to avoid hassles. Always print ACTUAL SIZE.
Note: – These digital patterns are password-protected and cannot be digitally edited. They are intended for printing, assembling, and use only. Please unzip the downloaded folder(s) to access and print the PDF patterns. Once printed, you may modify the patterns as needed to suit your specific requirements.
Enjoy your sewing project. Looking forward to see you again!