HOW TO TAKE BODY MEASUREMENTS (SAREE BLOUSE)
VERY IMPORTANT STEP IN PATTERN CONSTRUCTION
Saree: If you’re not familiar with sarees (often spelled sari), let me give you a quick description about this extra-ordinary 6 yards of elegance. A saree, is a traditional garment that is widely worn in India, Sri Lanka, Bangladesh, Nepal, and Pakistan. It is a timeless piece of clothing that holds deep cultural significance in these regions. A saree is typically made from various fabrics, ranging from lightweight cotton to rich and luxurious materials such as silk, chiffon, or satin. It consists of a single, unstitched piece of cloth that measures between 6 to 9 yards in length, although the exact length can vary. What makes the saree truly remarkable is its versatility. It can be draped in numerous ways, with each style known as a drape. There are over 300 different draping styles, each with its own unique charm and cultural heritage. The style of draping varies from region to region, and even within communities, showcasing the diversity and artistry associated with the saree. The process of draping a saree involves carefully pleating and wrapping the fabric around the body, creating graceful folds and layers.
Sarees are worn on various occasions, ranging from everyday wear to formal events such as weddings, festivals, and celebrations. They are not only a symbol of cultural identity but also a fashion statement, with modern adaptations and contemporary designs attracting attention on international runways.
The beauty of the saree lies in its ability to accentuate the natural curves of a woman’s body while exuding elegance, grace, and femininity. It is a garment that transcends time and continues to be cherished as a treasured piece of attire, representing tradition, craftsmanship, and timeless beauty. It is usually worn with a fitted blouse often called choli which complements the saree and completes the ensemble.
Saree Blouse: The saree blouse holds paramount importance as a companion to the saree, playing a crucial role in enhancing its overall charm. It serves as a perfect complement, accentuating the saree’s beauty and glamour. Offering a diverse range of choices, from conventional to contemporary runway trends, saree blouses come in countless designs. Usually cropped at the waist, the blouse gracefully envelops the upper body when paired with a saree or lehenga. In India, the saree blouse is commonly referred to as “choli.”
Saree blouses come in various forms, including heavily embellished ones, designer creations, readymade options, intriguing lehenga cholis, sequined variants, bridal cholis, trendy bustiers, and jacket-style blouses, among others. These exquisite designs draw inspiration from diverse sources such as cinema and the fashion industry. They cater to different body types, featuring a variety of cuts and designs.
In today’s world, a well-crafted and perfectly fitted saree blouse can enhance the allure of not only sarees but also lehengas, skirts, and even pants. It bestows a sense of elegance and regality upon the wearer, adding grace to the overall ensemble. Furthermore, a versatile saree blouse becomes a valuable addition to one’s wardrobe, capable of capturing the attention and admiration one deserves.
Lets see how to measure for these sensuous bloses.
To purchase a PDF pattern or a ready-made saree blouse, it is crucial to have precise measurements of your body. Understanding your body type is key to finding the ideal blouse size or the pattern that fits you perfectly. One common mistake that is often overlooked is failing to recognize potential changes in your measurements since your last measurement. Factors such as age and lifestyle can impact your size. Therefore, it is important to regularly take your measurements, especially when you are planning to buy a new pattern or a garment.
The following diagram shows you how to measure for a saree blouse.
If you are a beginner, its completely normal to feel a bit uncertain or overwhelmed when faced with the task of taking body measurement for your saree blouse. However, its important to remember that accurate measurements are crucial for achieving the desired outcome. Taking the time to carefully measure and record the necessary dimensions will greatly contribute to creating garments that fit well and make you feel confident. Keep in mind that everyones body is unique. However, it is important to be patient and allow for extra time during the initial stages. This investment will undoubtedly save you time and money in the long-run. Ensuring precise measurements is a crucial part of dress-making, as they determine the distances from the fundamental reference lines to the basic seam line of your garment.
Designing and crafting your own saree blouse is truly a rewarding experience, offering a sense of fulfillment and delight. If you’re not yet ready to create your own blocks or patterns from scratch, you have the option to explore and purchase any of our available patterns. These patterns can serve as a helpful starting point to create the garments you desire. With a wide range of saree blouses to choose from, you can revamp your wardrobe and proudly showcase your unique creations to the world.
Please note that the following information is intended as a general guideline. You are welcome to use your own preferred method for taking measurements for your project.
Keep these important tips in mind when taking measurements:
- Use a flexible measuring tape: Ensure that your measuring tape is pliable and can easily wrap around the body without causing discomfort or distortion in the measurements.
- Stand naturally: Stand comfortably and naturally while taking measurements. Dont slouch or stand too stiffly, as it might affect the accuracy of the measurements.
- Not too tight, not too loose: The measuring tape should be snug against your body, but not too tight. It should show your bodys shape without squeezing or distorting.
- Wear the right undergarments: To get precise measurements, wear the undergarments you will be wearing with the garment you are making. This helps account for any extra bulk or support provided by specific undergarments.
- Get some help if needed: Though it is possible to take your own measurements, we suggest seeking help from someone else to ensure accurate and reliable measurements. This will minimize the chances of obtaining inaccurate or distorted measurements. It is also a good idea to gather measurements from a diverse range of individuals to better comprehend different body structures.
- Take measurements more than once: For better accuracy, take each measurement at least twice and compare the results. Consistency is important to ensure a well-fitted garment.
- Write it down right away: As you take the measurements, write them down immediately. This will prevent any confusion or forgetting later on. Good record-keeping is essential for pattern making and garment construction. You may print the measurement sheet provided below.
IMPORTANT STEP BEFORE TAKING MEASURMENTS
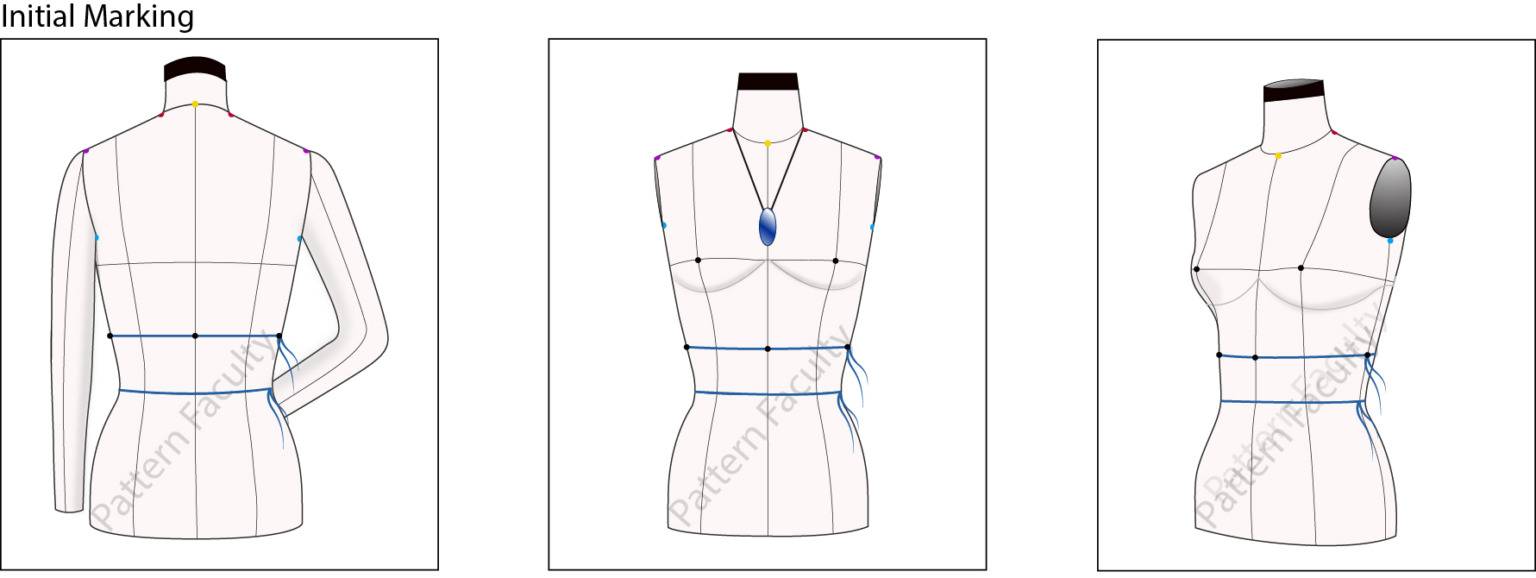
Body Marking: Prior to commencing the measurement taking process, it is imperative to clearly designate the following positions. These positions will be utilized repeatedly throughout the measurement-taking procedure and must remain consistent. To mark these points, you have the option to use a washable pencil in a darker shade, stickers, or pins. While taking measurements, it is crucial to ensure that the marked positions do not shift. In the diagram provided below, these positions are clearly indicated and they are colour corded.
- High Neck point (red)
- Shoulder bone Point left and right (purple)
- Apex points (black)
- Under Arm Point (blue)
- Waist Circumference (blue)
- Waist point left, right and the center (black)
- Mid neck point front and back (yellow)
How to locate these points:
- High Neck Point (Side of Neck): To establish the designated points, simply run your fingertips along the upper surface of the shoulder muscle and mark the spot where it intersects with the neck. Alternatively, you can have your model wear a thicker and longer chain adorned with a heavy pendant and identify the point where the chain rests on the neck.
- Shoulder Bone Point: Place your finger at the center of the model’s neck, near the top of the collarbone. Run your finger along the collarbone towards the shoulder until you reach the tip of the shoulder bone. This is the area where the arm bone connects to the shoulder bone. Keep your finger in this position and instruct your model to rub her palms together in a circular motion at chest height. You will sense movement at the tip of the bone. Once you identify this position, make a mark to indicate the shoulder bone point.
- Apex Points: Identify and mark the highest points of the bust on both apex points. This can be accomplished by stretching a ribbon across the bust points, ensuring it lightly touches the bust point, or alternatively, you can ask the model to directly indicate the apex point.
- Under Arm Point: Take a measuring tape and wrap it around the armhole, ensuring a comfortable fit. The tape should neither be too tight nor too loose. Once you are satisfied with the fit, mark this position. You can also record this measurement on your measurement sheet bust circumference measurement. You can also have your model hold a ruler under her arm in a comfortable position and mark the corresponding point. However, when it comes to saree blouses, the first option is the more dependable choice.
- Waist Circumference 1: Secure a string or a piece of inch elastic around the natural waist of the model. Instruct the model to bend from side to side and back to front until the elastic settles comfortably around her natural waist position. Keep this waistband in place while you proceed to take all the necessary measurements. You can also mark the position all around using an erasable pencil. The natural waistline typically falls approximately halfway between the ribcage and the belly button.
Important: When measuring for a saree blouse, it is essential to tie two separate elastics. One elastic should be tied around your actual waist for proper fitting, while the other elastic should be tied to measure the circumference of the saree blouse length.
- Waist Circumference 2: Mark the sides and the mid-point of the waist
- Mid neck point front and back: Mark the points as shown in picture below.
Important points to remember:
- The measurements should be taken comfortably, ensuring a snug fit, unless stated otherwise. Make sure it is not too tight or too loose.
- Hold the measuring tape firmly. It is recommended to measure multiple times to ensure accuracy. Even a small change in the position of the tape measure can have a noticeable effect on your measurements.
- When taking horizontal measurements, it is important to keep your measuring tape parallel to the floor unless otherwise specified.
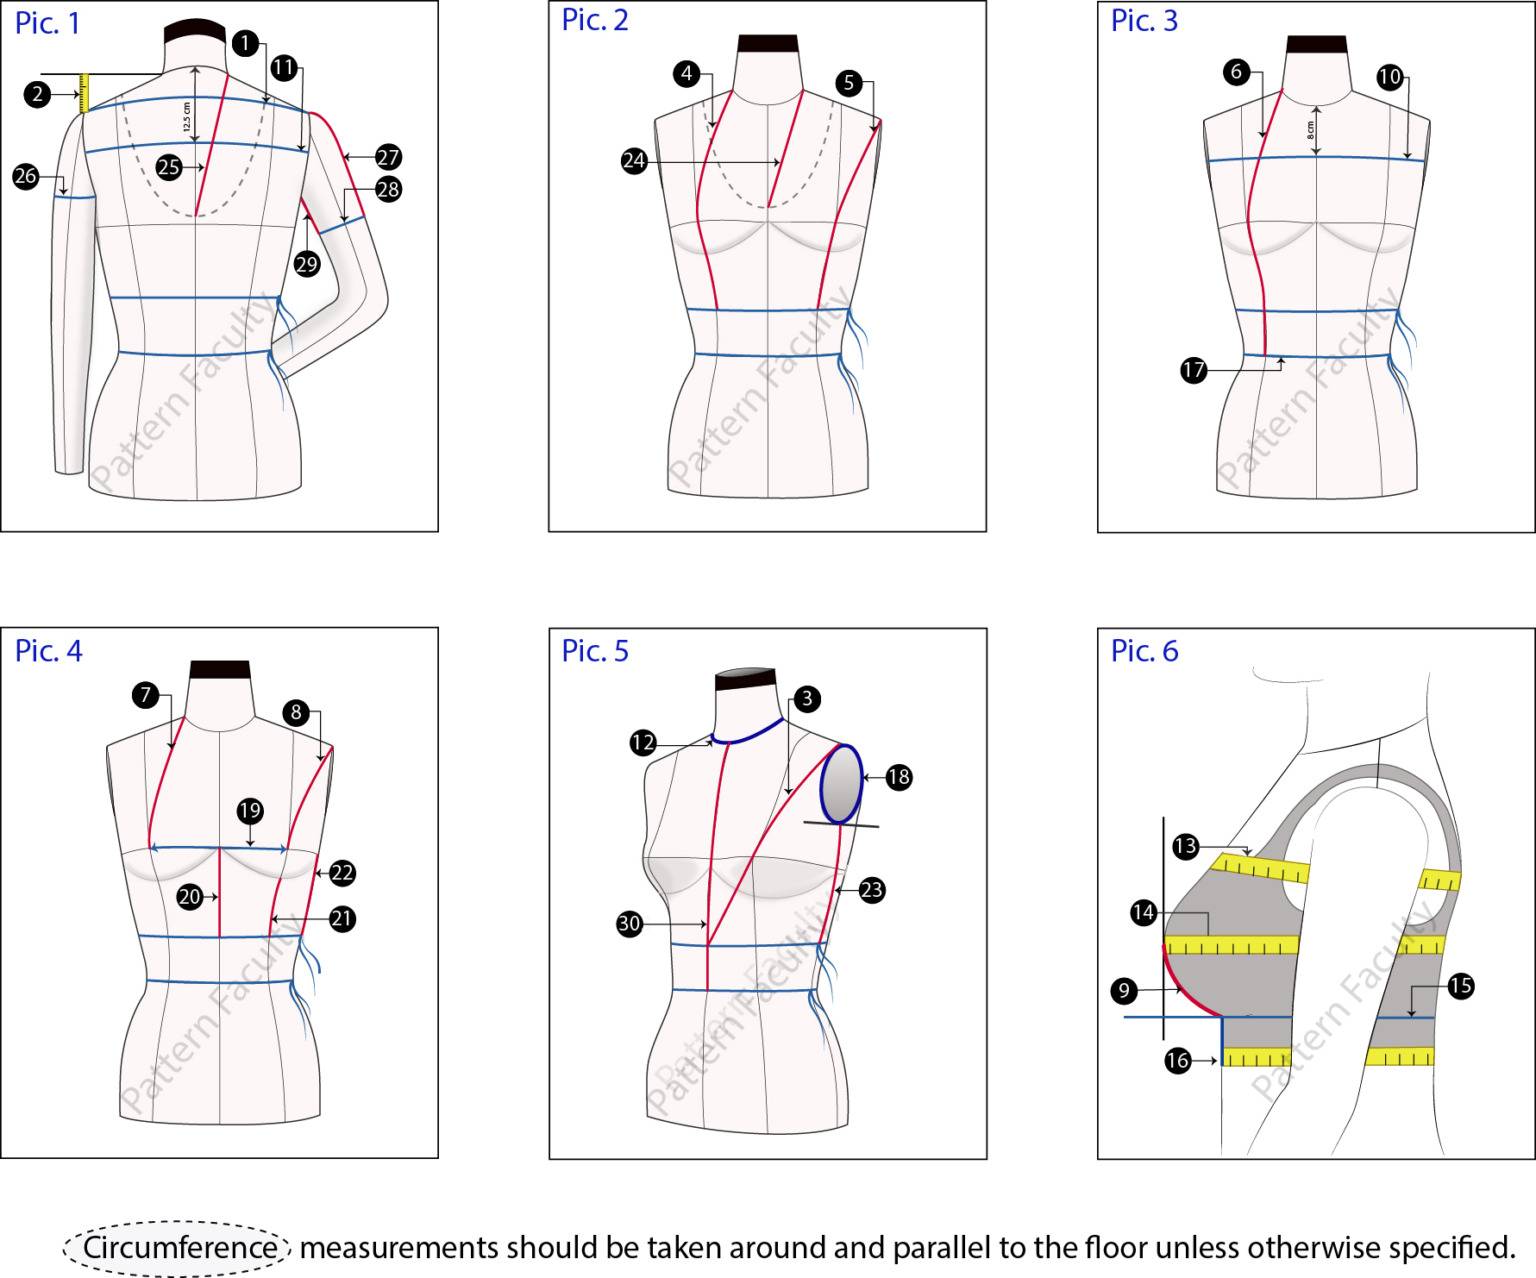
How to take the measurements. Refer to the above diagram.
It is essential to record all the measurements needed for your project as a precautionary measure, in case you need to double-check the pattern later on. At times more measurements is better. Please note that you may not end up using all of the measurements during the pattern creation process.
- Shoulder Length from left to right (back) Pic 1: To measure, position your measuring tape on the shoulder bone from the left shoulder bone, curving slightly up towards the neck bone at the back, and then continue to the right shoulder bone. Once you are satisfied with the placement, record the measurements.
- Shoulder Slope Pic 1: Instruct your model to stand against a wall. Place a straight ruler at the neck point, extending it beyond the shoulder point while keeping it parallel to the ground. Measure the distance between the shoulder bone and the ruler. Please refer to Pic.1.
- Shoulder Point Pic 5: Measure from the shoulder point, across the bust, to the center front waist of the blouse. Make sure you take the bust curve into consideration.
- Length of the Blouse – Pic 2: Measure from the neck point at the front, across the bust to the blouse length you desire.
- Length of the Blouse – Pic 2: Measure from the shoulder bone point at the front, across the bust to the blouse length you desire.
- Length of the actual waist – Pic 3: Measure from the neck point at the front, across the bust to the actual waist. The natural waistline typically falls approximately halfway between the ribcage and the belly button.
- Bust Level – Pic 4: Measure from the neck point at the front, to the highest bust point.
- Bust Level – Pic 4: Measure from the shoulder bone point at the front, to the highest bust point.
- Under Bust Level – Pic 6: To obtain an accurate measurement, please measure from the highest point of your bust to the under-bust level where the bra wire typically rests. Ensure that your tape follows the natural curve of your bust. It is crucial to take the curved measurement correctly.
- 8 cm below across measurement front – Pic 3: To take the measurement, begin by locating the collarbone at the center of your front neck. From there, move 8 cm down in a straight line. Once you reach this point, measure the distance between the creases of the left and right armholes across that point. This is you across chest measurement.
- 5 cm below across measurement back – Pic 1: To take the measurement, begin by locating the base of the neck at the center of your back neck. From there, move 12.5 cm down in a straight line. Once you reach this point, measure the distance between the creases of the left and right armholes across that point. This is your across back measurement.
- Neck Circumference – Pic 5: Run your tape measure around the neck comfortably and take the measurements.
- Chest Circumference (upper bust) – Pic 6: Wrap the tape around your upper bust area, making sure it is snug yet comfortable. Keep in mind that the tape may not be parallel to the ground at the front due to the natural curvature of your body, but make sure your measuring tape remains parallel to the ground at the back. Adjust the tape to a position that feels most comfortable for an accurate measurement. If need be, measure twice to make sure you get this right. When you are happy, record your measurements.
- Bust Circumference Pic 6: To take the bust measurement, outstretch the arms across the body and place the measuring tape up around back shoulder blades and parallel to the ground. Bring the tape around the fullest part of the bust. While holding the tape in place, get your model to lower her arms. Your tape may expand slightly for the back expansion. Make sure your measuring tape remains parallel to the ground at the back, the sides and the front. If need be, measure twice to make sure you get this right. When you are happy, record your measurements
- Under-bust circumference – Pic 6: Wrap the tape measure around the area beneath your bust where the bra wire rests comfortably, and record the measurements.
- Waist Circumference at the blouse level Pic 6: Make sure the waist markings you have created earlier by tying an elastic has not shifted. It should be parallel to the ground and accurate. Run your measuring tape around your blouse length circumference and record your blouse waist measurements. Do not take this measurement tight or loos.
- Waist Circumference at the actual waist Pic 3: Make sure the waist markings you have created earlier by tying an elastic has not shifted. It should be parallel to the ground and accurate. Run your measuring tape around your actual waist and record the measurements. Do not take this measurement tight or loos. The actual waist typically falls between the under bust and the navel region.
- Armhole Circumference Pic 5: Run the tape measure around the armhole comfortably and take the measurements.
- Apex to Apex Pic 4: Measure between Apex to Apex points and record this measurements. Proper bra should be worn.
- Crosslet Height Center Front Pic 4: To obtain this measurement, start from the blouse waist point and measure towards the center front (CF) straight up, locating the point between the bust. This measurement is commonly used to create midriff yokes and other garment components.
- Crosslet Height Under-bust Front Pic 4: To take this measurement, start by measuring from the under bust area in a straight line from the apex to the level of the blouse. For a clearer understanding, please refer to the diagram provided above (pic 4).
- Crosslet Height side of the blouse Pic 4: To determine this measurement, simply measure from the waist to the point where the bust tissue naturally ends along the side seam. For better clarity, you can refer to the accompanying diagram (pic 4) provided above.
- Underarm to blouse length Pic 5: To measure, start from the underarm point and measure straight down to the waist along the side seam.
- Neck point to Neckline Depth front Pic 2: To take this measurement, begin at the neck point and measure down to the desired depth of the neckline at the front. The specific depth is entirely a matter of personal preference.
- Neck point to Neckline Depth back Pic 1: To take this measurement, begin at the neck point and measure down to the desired depth of the neckline at the back. The specific depth is entirely a matter of personal preference.
- Bicep Circumference Pic 1: To measure the circumference of the arm, begin by placing two fingers beneath the armpit. Then, mark the point where the bottom of the lower finger intersects with the arm. Once marked, relax your hands and use a measuring tape to carefully measure the complete circumference of the arm at the marked location. Remember to record the measurements. It is recommended to seek assistance from someone when taking certain challenging measurements.
- Sleeve Length Pic 1: To obtain this measurement, measure from the shoulder bone to the desired length of the sleeve you intend to make. The length of the sleeve is entirely based on personal preference. If you plan to create a sleeve that extends beyond the elbow, remember to bend your elbow while taking the measurement.
- Base of sleeve (sleeve opening hem) Pic 1: Measure the circumference of the arm where you have marked as sleeve length. This can be above the elbow, mid arm or wrist. Keep the length of the sleeve marked in order to take the next measurement (measurement number 29).
- Underarm to sleeve length Pic 1: Measure from the underarm position to the length of the sleeve. Refer to the diagrams above from time to time while taking measurements.
- Nape to Actual Waist Pic 5: Measure from the collar bone (mid of the front neck) to the actual waist.
Please keep in mind that the instructions provided are just general guidelines, and you are free to use any other method that you prefer or find more suitable.
Click here to download the Saree Blouse Measurement Sheet.
Creating your own unique piece of clothing can bring immense joy and satisfaction. If you’re not ready to make your own blocks or patterns, you can choose from our selection of patterns to create the garments you need. We offer various types of downloadable PDF block/patterns that can serve as a starting point for creating a brand new wardrobe. You can proudly showcase your creations to the world, knowing that you made them yourself.
Happy Sewing!