Saree Blouse Tutorial – Page 1 Of 2
Basic Saree Blouse Sewing
The following instructions and illustrations provide you a walk through on sewing a Saree Blouse. This guide is applicable to any style, including those with deep necklines, high necklines, and designer tops. The individual illustrations of a designer blouse panel for the front or back are being provided to you herewith. Upon completing the assembly of the designer panel (front or back), you can proceed to sew the remaining blouse by following the steps outlined below. It’s important to note that these steps are merely one possible approach, and feel free to tailor the process to your liking.
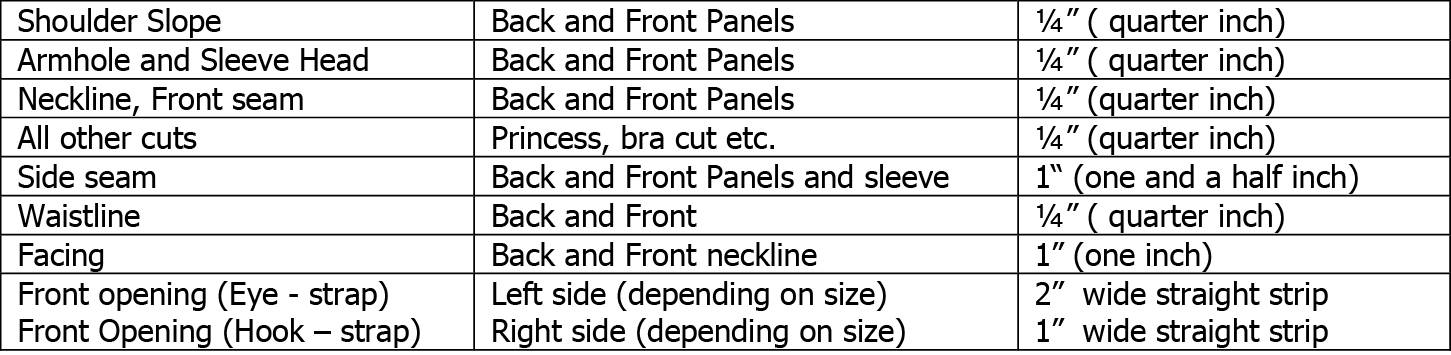
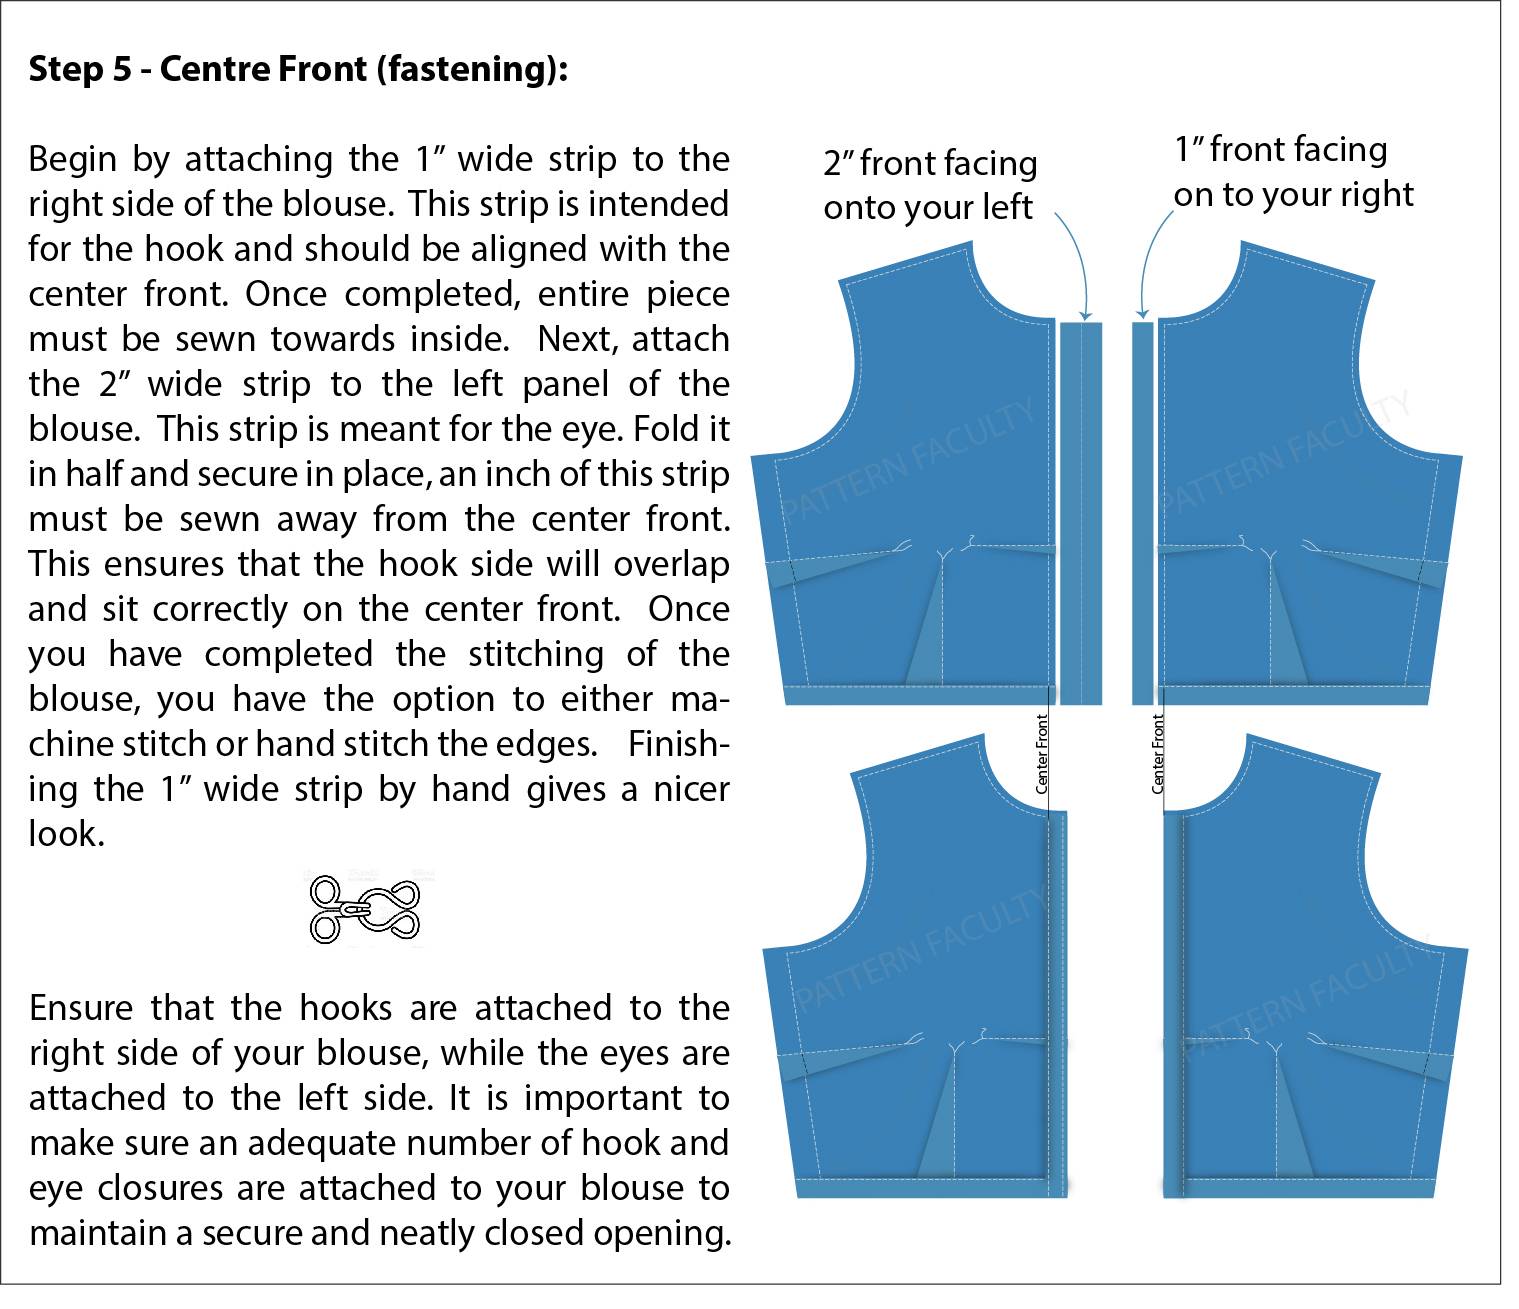
Step 1. Seam Allowance and Facings
Please note that not all our patterns include sewing allowance and facings. The product descriptions of each and every item clearly indicate whether sewing allowance or facings are included within the pattern. In the event that your pattern requires sewing allowance or facings, you have the option to utilize the minimum allowances provided below or make adjustments based on your individual preferences. To make it easier to handle while sewing, it is recommended to cut your facings approximately an inch longer. Excess fabric can be cut off later.
Recommended Sewing Allowance:
Preparation:
- Prior to cutting, it is advisable to wash your fabric to prevent any potential shrinkage.
- Iron the fabric to remove any creases or wrinkles.
- Fold the fabric in half, ensuring that the folded edge is on your side.
- Take note of the pattern pieces that should be placed on the fold and position them accordingly.
- Align the pattern pieces with the grain-line as indicated on each individual piece. Please be aware that, depending on the design, certain pattern pieces may need to be cut on the bias.
- Trace the pattern onto the fabric using a tracing wheel and carbon paper, marking all darts, notches, and seam lines. Ensure that all tracing marks are marked on the wrong side of the fabric front and back. Once the pattern is traced, carefully cut along the cutting lines to separate the fabric pieces.
- Use matching threads for stitching your blouse and fill the bobbin with the same color thread.
- Before and after your project, make sure to clean the sewing machine thoroughly. (A good practice to have).
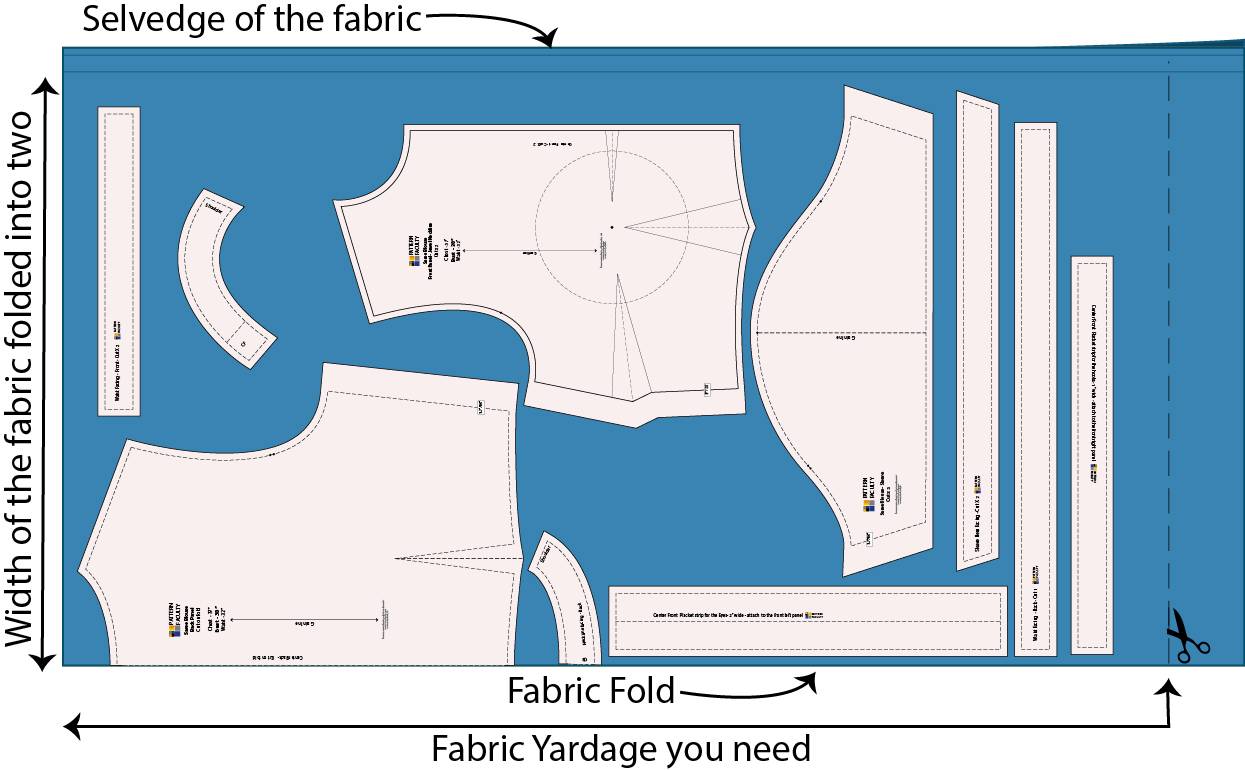
Step 2: How to check the fabric yardage required
To begin the process of calculating fabric requirements, gather all the pattern pieces you need to estimate yardage. Ensure that each pattern piece has seam allowances and that any required facings have been cut. Lets assume we are working with 36 wide fabric. Place a sheet of brown paper on a table, forming a rectangular surface of 18 width away from you and about 35 – 38 length to your right. Utilizing the bottom corner as the folded edge, arrange your pattern pieces on the brown paper surface leaving 1 for the selvedge while ensuring they are aligned with the grain line. Its advisable to subtract an inch from the width of the fabric to allow for the selvedge. Therefore, when purchasing 36 wide fabric, you should arrange your patterns within a 17 width to determine the required yardage accurately (36 wide folded into two then minus 1 for selvage = 17). Refer to the picture below.
Once you have confirmed that your layout fits within the desired width and that all pieces are aligned with the grain line, measure the distance from the lower side of the brown paper (horizontally), starting from the left and moving to the right. This measurement represents the amount of fabric you need to purchase. If you know the width of the fabric you are going to purchase, it will help you to find the yardage much easier. For the yardage chart you may refer to: https://www1.patternfaculty.lk/estimating-yardage/
Pattern Layout on Fabric (Example)
As we are working with a front open blouse pattern, we will be positioning the back panel on the fold. If you happen to have a back opening blouse, ensure that you position the front piece on the fold. Please note that certain pieces may require just a single piece. Refer to the example of pattern layout on fabric provided below:
This is an example only (Four Darted Blouse with a Jewel Neckline) below illustrations are not to scale
Sample Blouse (Test-run): It is highly recommended you stitch a test blouse before finalizing the pattern. You may use fabric such as muslin or cotton for the initial test-run. If you have to fine-tune the pattern, do so at this stage. Make sure you trace all your darts and sewing lines correctly and saw it together as per the instruction given below. Once you are content with the fit, you can proceed to create your blouse using your chosen fabric.
Here is a link to how to tune up: https://blog.patternfaculty.lk/alterations-tune-ups/
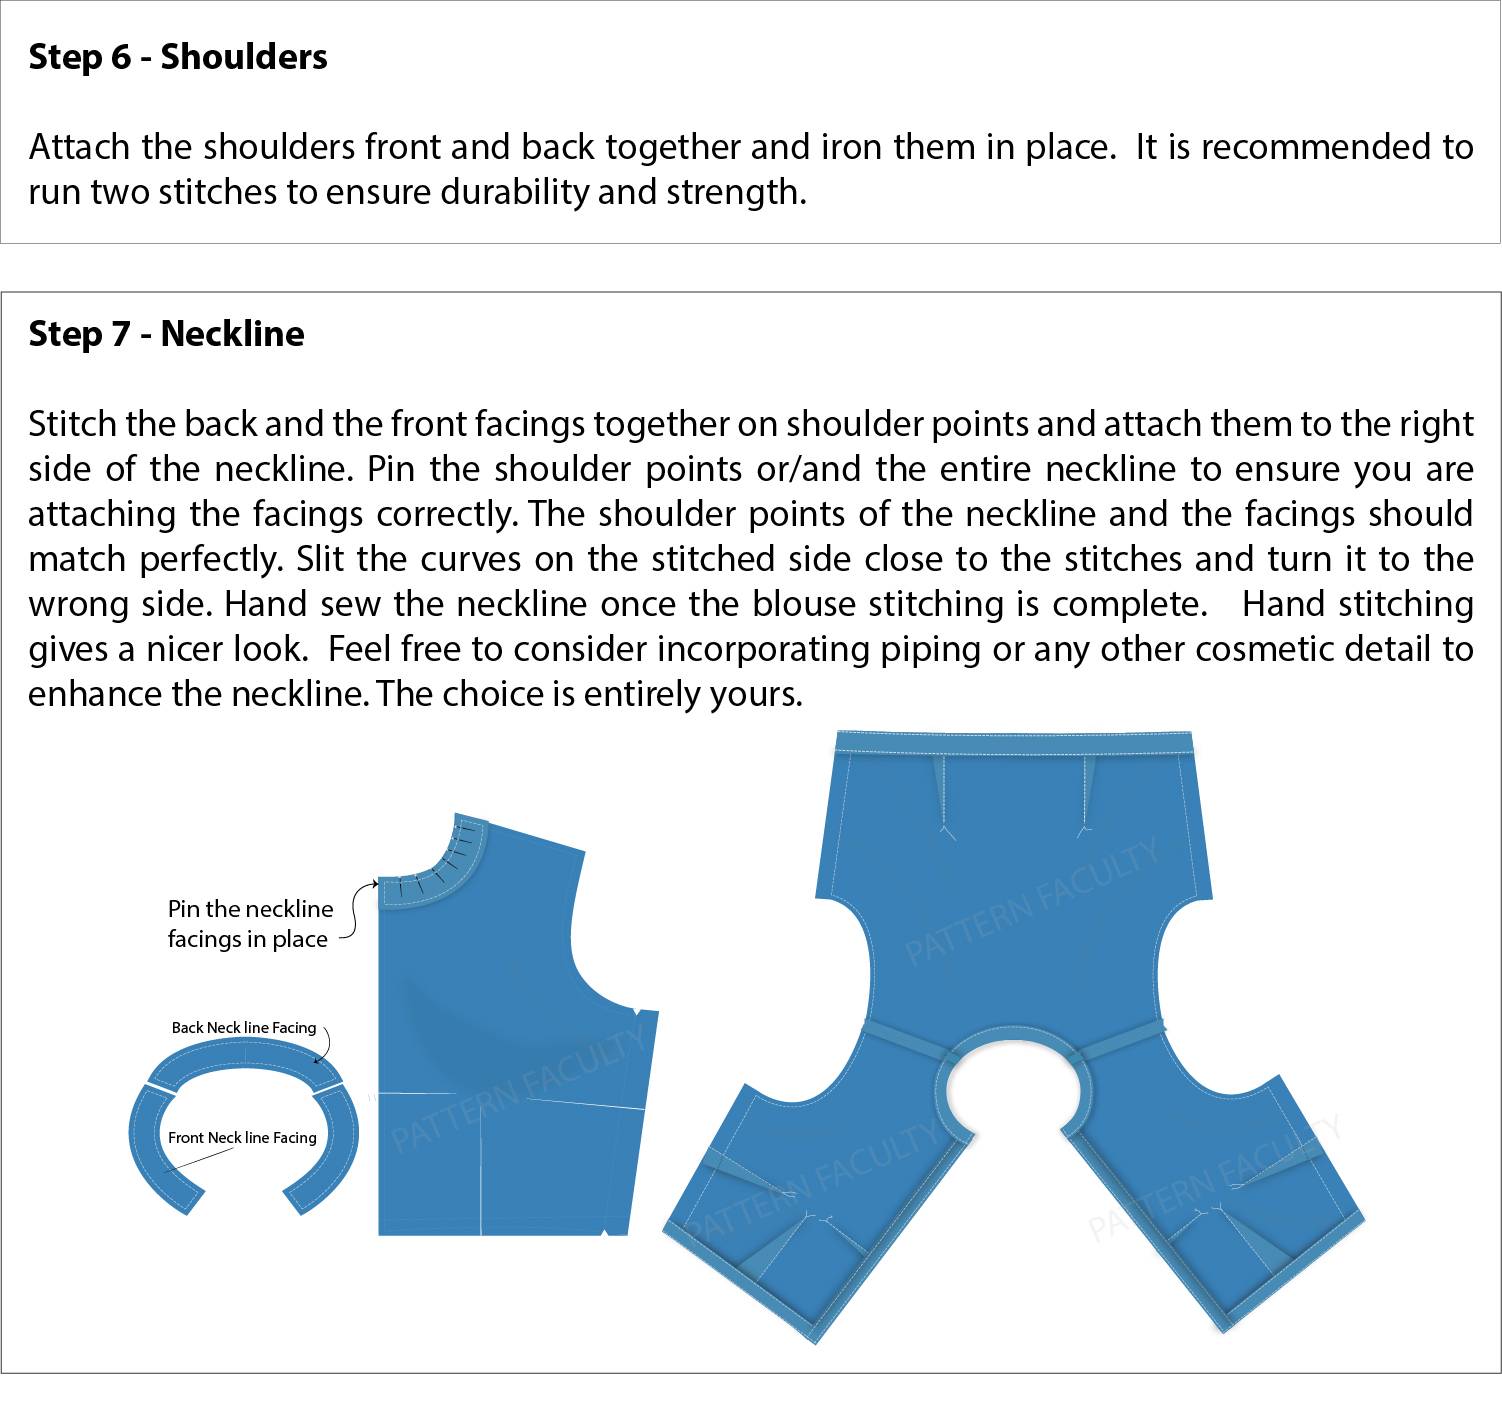
IMPORTANT: These saree blouse sewing steps are just one of several methods available. Feel free to sew your blouse using your preferred approach. You have the flexibility to attach the waistband either before or after attaching the center front plackets and completing the shoulders and necklinesit’s entirely up to you how you choose to put together your blouse.
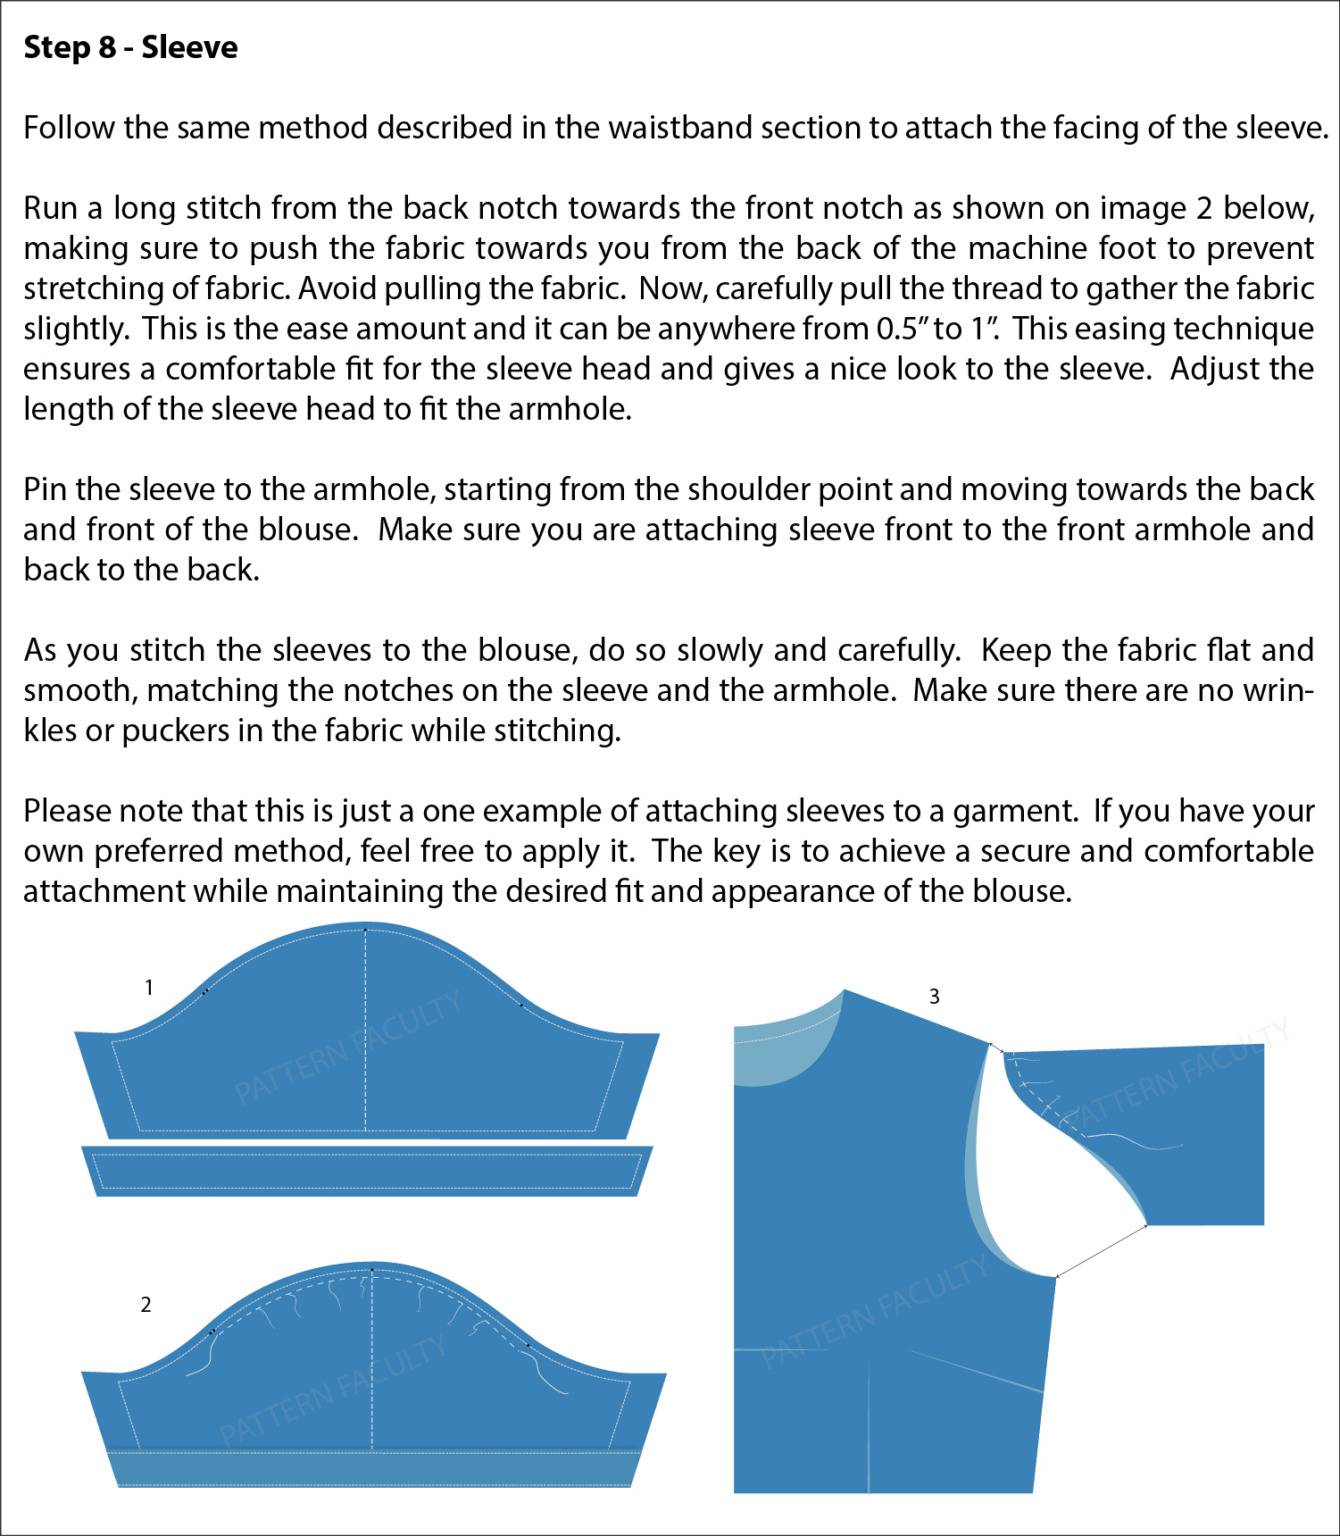
Step 9 – Side Seams: Once the sleeves are securely attached to the armhole, proceed to finish the side seams on both sides, starting from the sleeve opening to the waistline. If you feel comfortable and confident, you have the option to complete the side seams of the blouse and sleeve separately and then attach the sleeve to the blouse. The choice is yours.
Step 10 – Hand Sewing: Hand stitch and complete the neckline, sleeve opening and the waistline hemming. Attach hooks to the right and eyes to the left opening to complete the blouse.
Step 11 – Bra Strap holder: You may create a loop on the shoulder to hold your bra strap in place. This step is optional but highly recommended especially if you are making a deep neckline blouse.
Step 12 – Over-lock: If you have an over-lock machine, you may over-lock all the raw edges to give it a cleaner finish on the wrong side too.
Step 13 Finishing: Cut all the unwanted threads, iron and make sure the blouse is neat and tidy inside out.
Additional note: Let your creativity run wild as you explore the realm of glamour for your Saree Blouse! Feel free to embellish it with piping, sequins, color blocking, laces, buttons, ribbons, and more. The possibilities are endless when it comes to adding cosmetic touches to your garment, and the choice is entirely yours. Go ahead and give your Saree Blouse that extra sparkle.
Sample Blouse (Test-run)
It is time to dive into a crucial step of stitching a test blouse. Please don’t skip this part. Grab some muslin or cotton fabric for a trial run. It’s your chance to fine-tune the pattern, so feel free to make any adjustments you need. Make sure you trace those darts and sewing lines accurately and follow the instructions given earlier when sewing it all together. The results will totally make you jump with joy! So go ahead, stitch that test blouse before sewing your blouse using your beautiful fabric.
Check List
Checklists play a vital role in dressmaking, offering benefits such as organization, efficiency, accuracy, time management, consistency, troubleshooting, and personalization. When it comes to fitting issues in saree blouse creation, checklists are invaluable in streamlining the process and preventing any oversights, ultimately leading to the production of high-quality garments. Below, you will find a compilation of crucial areas that should be checked during the fitting process for your saree blouse.
Shoulder Length: The shoulder should sit correctly on the shoulder bone on every Saree Blouse, either it is a deep neckline or high- neckline unless it is specified as per the design. Shoulder point shouldnt be hanging off your shoulder or pulling towards the neck. If it doesnt fall on the right position, adjust the shoulder-length by lengthening or shortening the shoulder length by depending on how much you may have to adjust.
The aim is to achieve a comfortable and natural fit where the shoulder seams align with the outer edge of your shoulders, and the shoulder point rests correctly on the shoulder bone. Adjusting the shoulder length as needed will help achieve the best possible fit.
Shoulder Seam line: The shoulder seam line should be approximately on your natural shoulder line. It shouldnt be too far forward or back. If you find any discrepancies, adjust the back or front panel accordingly. Do the adjustments 1/8 of an inch at a time until you get it right.
By ensuring that the shoulder seam line aligns with your natural shoulder line, you will achieve a more comfortable and flattering fit for your Saree Blouse.
Neckline: It is important for the neckline of a blouse to sit comfortably. If you find that the shape, depth, or any other aspect of the neckline is not to your liking, you have the flexibility to easily adjust it according to your preferences.
Bust Dart: For optimal fit, it is important that all bust darts in a blouse are pointing towards the apex point, which is the fullest part of your bust. If you feel that the dart end is either too close or too far away from your apex point, adjustments can be made to ensure a better fit. The specific adjustments will depend on the shape of your bust.
Keep in mind that the standard measurements provided on the chart are typically based on an average body type. If necessary, you can shift the apex point and darts while maintaining the width of the front body panel.
Armhole: The armhole seam line of a blouse should begin at the tip of the shoulder bone and smoothly curve towards the underarm, matching the natural crease where your arm joins the body. It is important to ensure that the armhole is neither too tight nor too loose. It should provide a comfortable fit that allows you to move your arms freely without lifting the blouse. If any adjustments are required, you may do so by lowering or lifting the armhole from the under arm position.
If you do any adjustments to the armhole, make sure you adjust your sleeve head to match your armhole giving 0.5 0.75 inches of ease to the sleeve head.
Sleeve: The sleeve of a blouse should provide a comfortable fit around the upper arm with just the right amount of ease. It is important to ensure that the sleeve is neither too tight nor too loose. Make sure the length of the sleeve is correct for your liking.
Creases in the underarm area: Lookfor any excess fabric which creates creases in the underarm area. If so, note it down and adjust the pattern accordingly. To remove the excess fabric, you might need to increase the width of the armhole dart or create a new dart specifically for that purpose.
When altering the armhole, it is crucial to make corresponding adjustments to the sleeves to ensure a proper fit with the new armhole shape.
Creases around shoulder area: In case you notice any creases around the shoulder area, it is advisable to make adjustments to the shoulder drop. Gradually modify it by ” increments until you achieve a comfortable fit.
Length of the Blouse: Make sure you are comfortable with the length of the blouse. If you find that the length is not to your liking, you can make adjustments as needed.
The following links may help you to do some minor tune-ups:
Alteration & Tune-ups: https://blog.patternfaculty.lk/alterations-tune-ups/
Sewing allowance & Facings: https://blog.patternfaculty.lk/saree-blouse-tutorial/
Whether you are a novice or a seasoned dressmaker, comprehending the fundamentals of dressmaking is crucial to produce garments that are impeccably tailored and boast a stunning finish. Therefore, it is vital to meticulously attend to the intricate details while creating your blouse. There is truly nothing quite like the satisfaction of sewing your own blouse, especially when wearing it with your finest Saree, allowing you to proudly flaunt your exquisite creation.
General Sewing Steps your easy reference
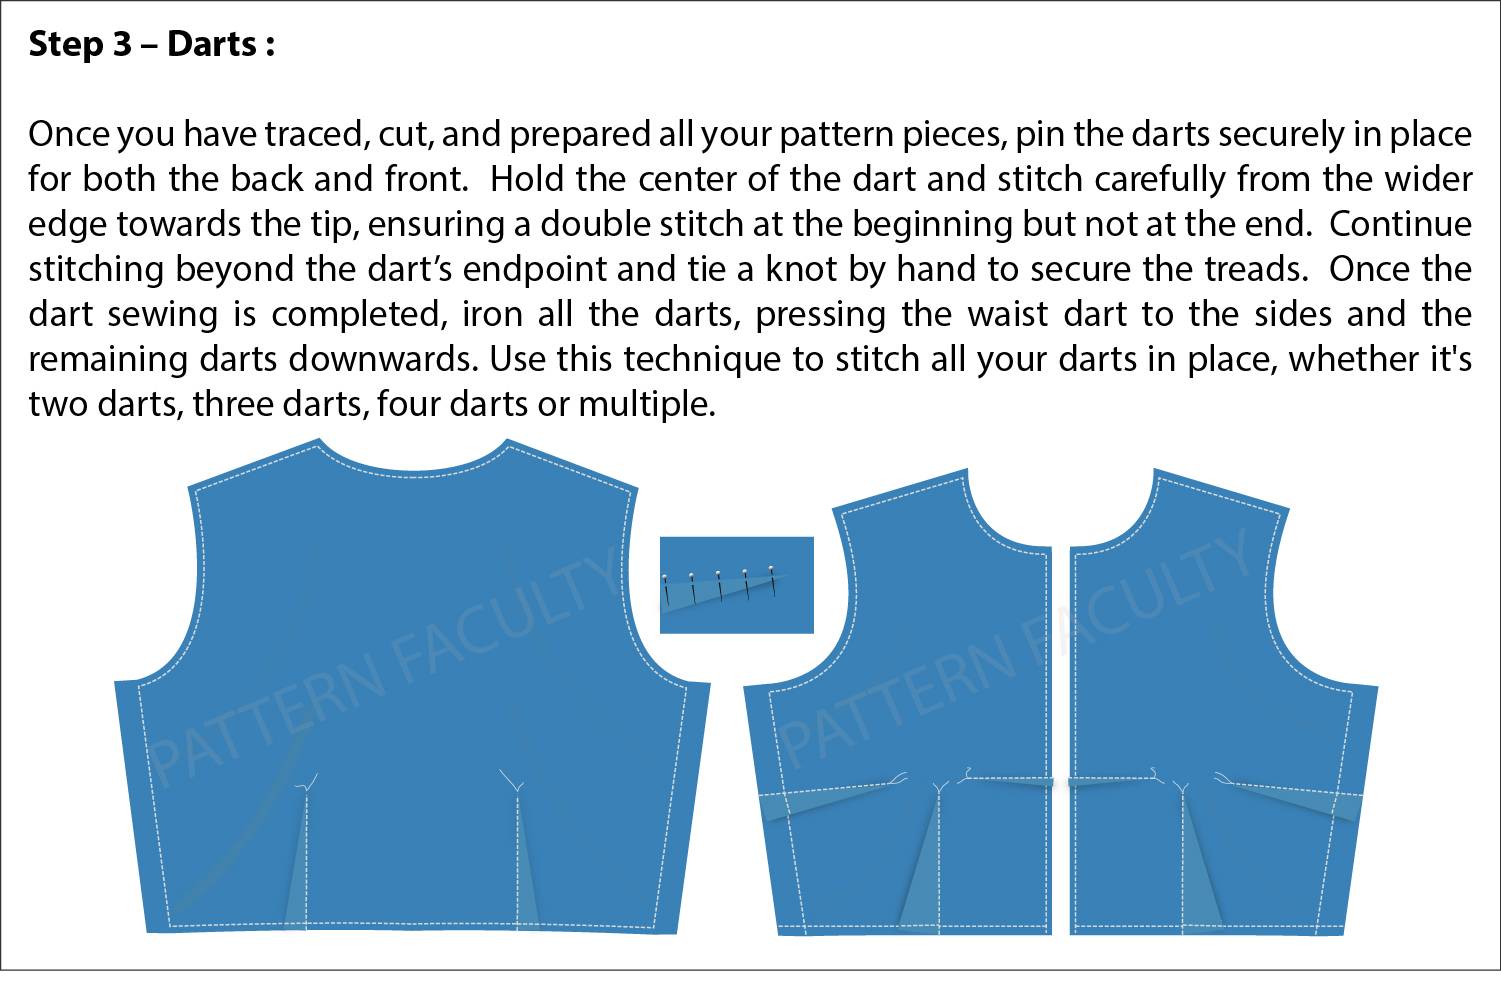
- Start by sewing the darts together. If you are making a designer blouse, Join the font panel pieces together along with the darts if any.
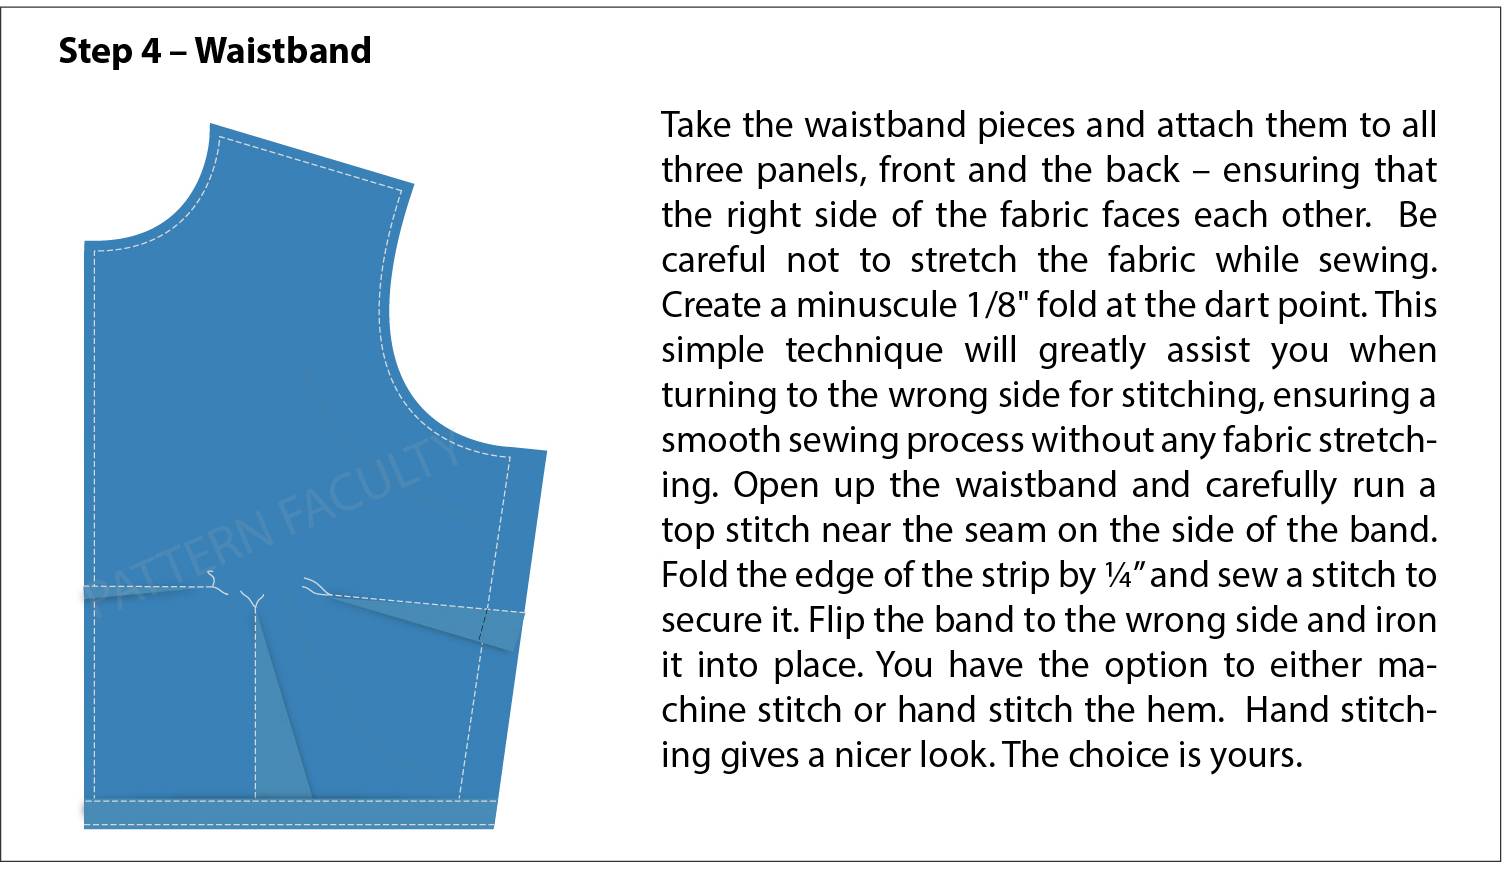
- Attach the waistband facings to the front and back of the blouse.
- Complete the Center front placket by working on both the left and right sides.
- Connect the front and back shoulders.
- Attach the neckline facings and finish the neckline.
- Add the sleeves to the blouse.
- Sew the side seams together to close the blouse.
- If you prefer, you can hand-sew the hem for a neater look.
- Securely sew the hooks and eyes in place.
- If desired, attach a bra strap.
- Remove any extra threads from the blouse.
- Give the blouse a good ironing to make it smooth.
Finally, you are ready to pair it with your finest Saree and rock your outfit!
Fitting and Adjustments: It is important to periodically try on the blouse to evaluate the fit. This allows you to make necessary adjustments to ensure the blouse fits well and enhances the body shape. Remember that our bodies undergo changes over time, so it’s essential to make any alterations as needed to maintain a flattering fit.
Finishing Techniques: Give careful consideration to the finishing details in order to add a polished and professional touch to any garment. These techniques encompass tasks such as hemming, incorporating facings or linings, skillfully inserting zippers or buttons, and employing finishing methods like serging to tidy up the edges.
Pressing and Ironing: Pressing plays a vital role in the dressmaking process, as it helps achieve a polished and professional finish. Utilize an iron to carefully press the darts and seams, ensuring they lie flat and have crisp and smooth edges. Pressing also aids in shaping the garment, removing wrinkles, and setting any pleats or folds in place.
Please find the sewing instructions for the designer panels on the subsequent page(s). These instructions will apply to either the front or back panel, depending on the style. Once you have successfully sewn the designer panel, proceed with the steps mentioned above to complete your saree blouse.
Happy Sewing!
Disclaimer: Please note that the above instructions, illustrations, links, and information provided here are intended to assist you in sewing your Saree blouse using the pattern you purchased from Pattern Faculty-LK. However, it is important to understand that this is not a comprehensive “sewing master class,” and the instructions provided should be regarded as a guideline only.
Terms of Use: You are welcome to use this pattern for both personal and commercial purposes. If you plan to use it commercially, please inform me in advance. However, it is important that you do not resell, distribute, or share this pattern without obtaining prior permission from Pattern Faculty-LK. All rights reserved. Please note that all sales of digital products are final, and no returns, refunds, or exchanges are available.
Go To Designer Saree Blouses Variations – Page 2 Of 2